Velvet a nodejs Music server. Originally a fork
Support for Sonos stuff, MPV, webplay. Try it (or not). Also with a docker release
Velvet a nodejs Music server. Originally a fork
Support for Sonos stuff, MPV, webplay. Try it (or not). Also with a docker release
Enjoy my fork of mStream Velvet
I have used mStream as based to provide for everything a music hoarder or music lover would like to see. And many features and functionalities are still in the roadmap.
You can use File Browsing based on folders / subdirectories, we have scanning the ID3tags, we have a special ALBUM feature where you can decide what folders have albums so that the scanner does not have issues with all those wrongly tagged music (if you have that).
There are soo much new features and functionalities that I need multiple pages to explain them.
to see for yourself: use Docker or Node and you can use mStream Velvet. The best music server (but you have to decide yourself)
After using many years mStream I forked the project when the initial release of SQLITE was introduced.
Missing many features in my music streamer, I decided to code it into my own fork using Claude Sonnet 4.6
No its not vibe coded as the main project was and is an aweful nice project, but slow progress over the last 2 years gave me the ability to think about features and functionalities I really wanted
And many more features.
As a previous user of many music streamers like Subsonic, Navidrome, this mStream Velvet version is my way of letting you know: you can try this and give me your feedback
There is a Dockerfile as well (whoeehooe) (and I do not like docker)
Check the github repository !
Gisteren publiceerde de KNZB de limieten voor het NJK. Aangezien Tim nog meedoet met O14 en daar in de meerkamp meezwemt heb ik een tijd geleden een website gebouwd voor de ranglijsten daarvoor zie deze link
wat niet veel mensen weten is dat ik daar ook nog een limieten website aan toegevoegd heb en die is niet direct zichtbaar vanaf de ranglijst pagina.
Maar wil je weten of je een limiet hebt gezwommen voor bijvoorbeeld de Overijsselse Langebaan kampioenschappen 2026, of de Gelderse Langebaan kampioenschappen 2026 of de NJK Langebaan kampioenschappen 2026 in Drachten dan kun je hier gaan kijken
De data halen we via een ingenieuze manier van swimrankings en die plaatsen we dagelijks in een database. op basis daarvan heb ik een eigen systeem gebouwd die informatie over zwemmer maar ook over de resultaten laat zien.
Heel lang geleden postte ik nog wel eens op deze blog. En toen werd het stil …
maar vandaag weer een berichtje
Afgelopen tijd bezig geweest om een alternatieve ranglijst website te bouwen met informatie over zwemmers, wedstrijden, ranglijsten en limieten welke te vinden is op deze mooie pagina
En heel mooi een NJK ranglijst pagina voor O14 welke direct wordt bijgewerkt wanneer er nieuwe meets / wedstrijden zijn verwerkt.
Data die ik ophaal via swimrankings en daarna in een eigen database zet.
We gaan kijken of dat een beetje bij te houden is en niet al te veel werk oplevert …
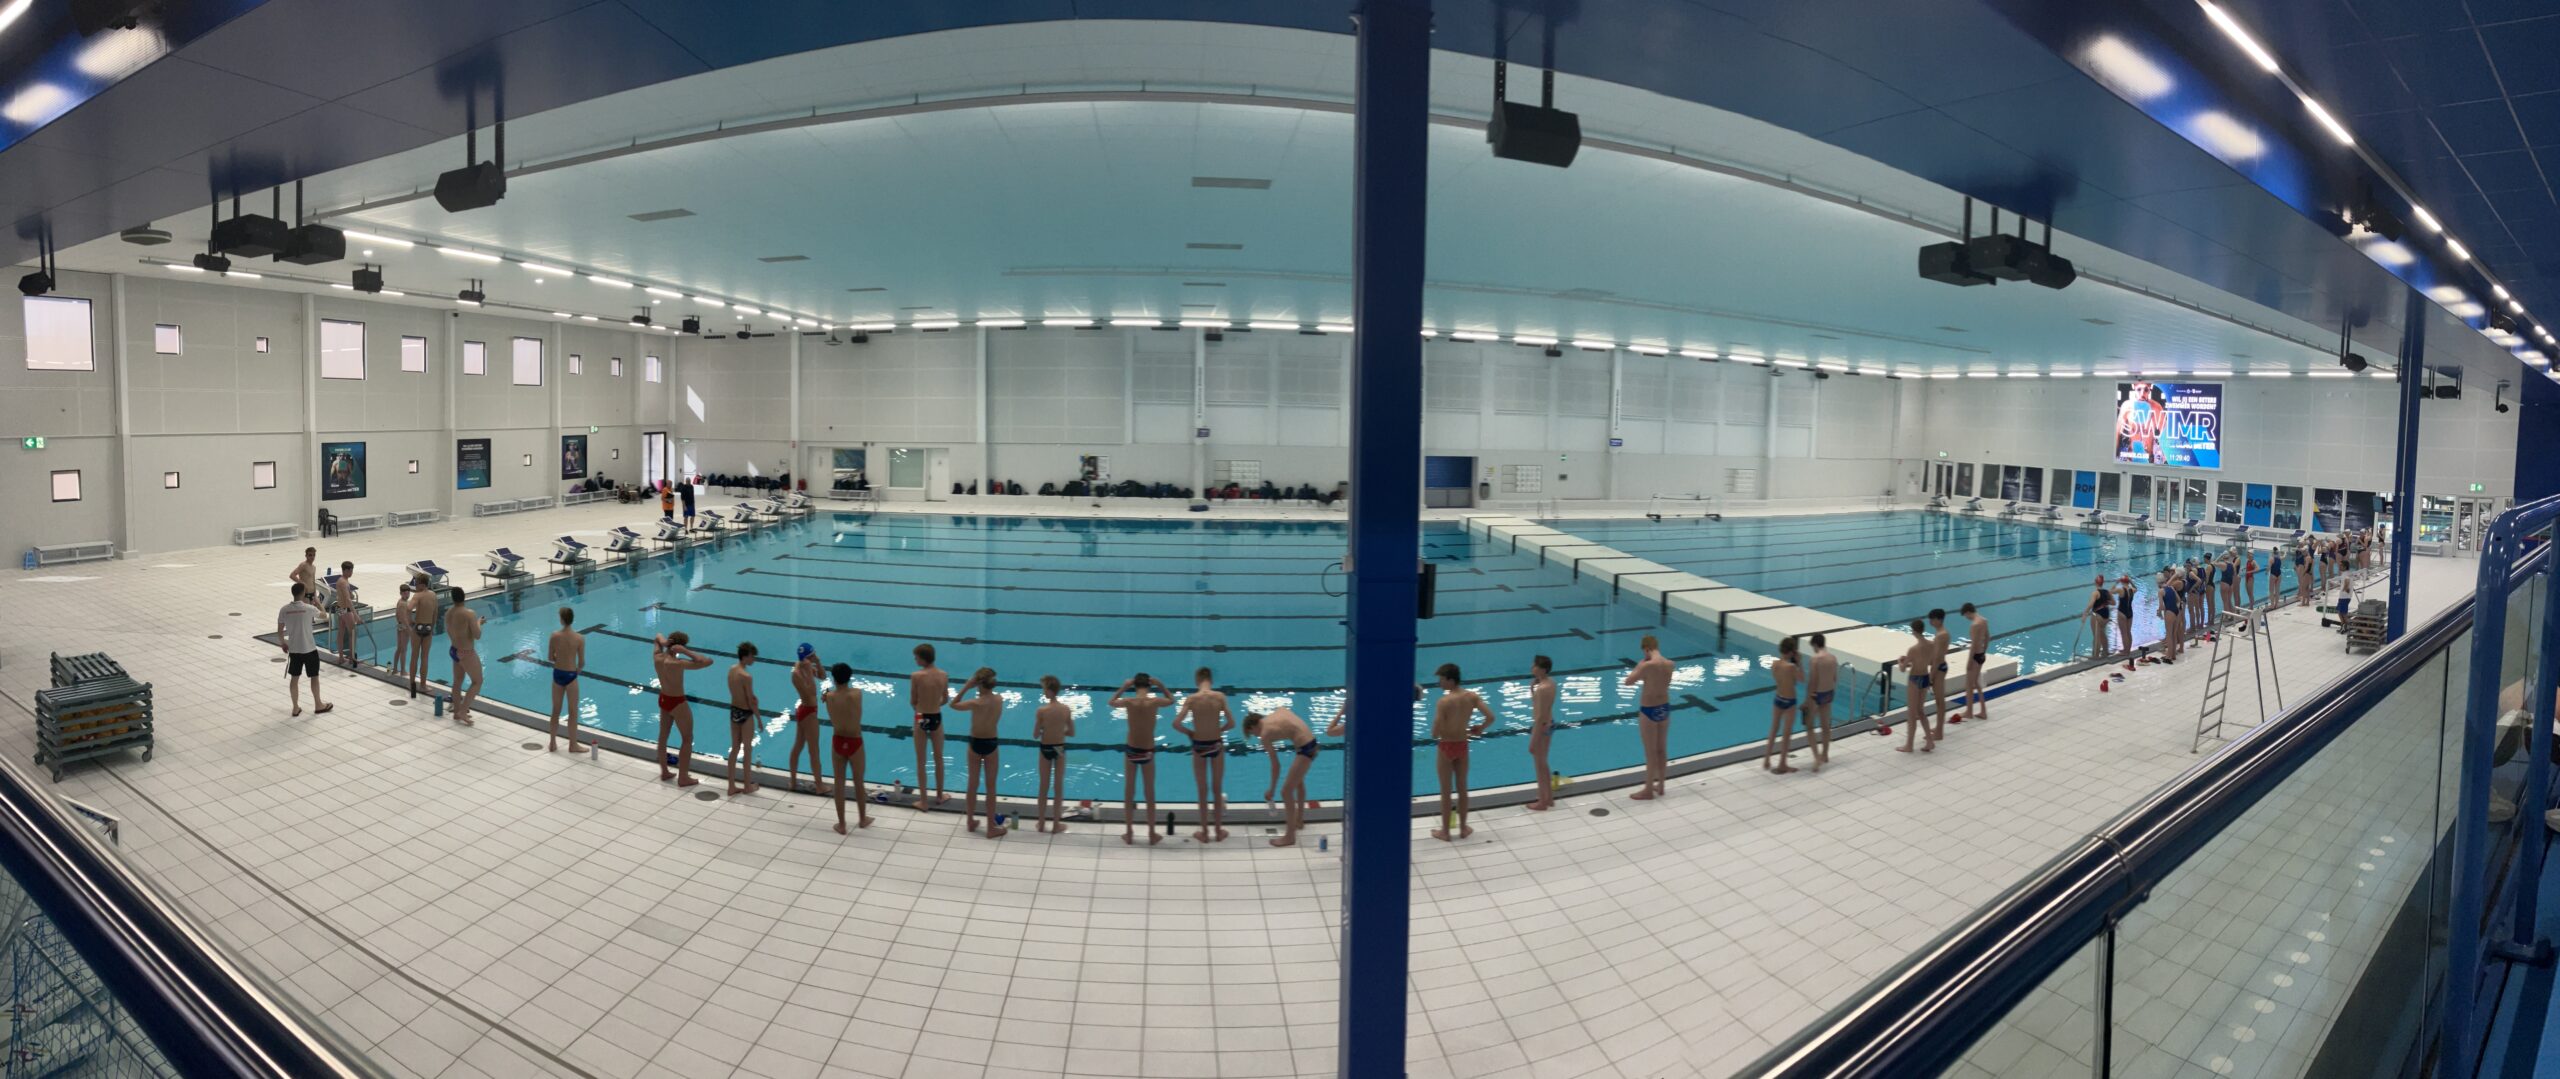
Panorama van 19-3-2025 De training van KNZB nationale selectie O15 Jongens en Meiden van 2012, 2011 en 2010. Tim is een van de geselecteerden en een van de twee jongens uit 2012 die mee mogen trainen. Een geweldige ervaring om te leren hoe op nationaal niveau training wordt gegeven. Als waterpolo fan, trainer en ouder ook leuk om er bij te zijn en allerlei oefeningen te zien. Van de warming-up naar het zwemmen en dan lekker met de bal afgesloten met een korte partijtjes..

Het eerste logo gemaakt door een toenmalige collega
Een lemon die vliegt .. Lemon mijn nick bij aroundtheworld.nl het SMS aroundtheworld spel van Libertel
Het was een bevalling om echomail weer aan te sluiten.
Door een domme tikfout aan het begin van de installatie binnen Fidian waar ik een nodenummer als 2:280:xxxx invulde waar het 2:280/xxxx moest zijn kwam ik in de problemen. Ontvangen en versturen van Netmail ging, maar het versturen en ontvangen van echomail ging niet.
Ok, ik ontving het wel, maar de PKT bestanden werden SEC of ASC bestanden en na onderzoek bleek het dan bestanden zijn geworden die dan niet meer juist verwerkt konden worden door welke reden dan ook.
Gelukkig op de goede weg gezet door Wilfred en daarna werden de echomail area’s automatisch aangemaakt en druppelden de eerste berichtjes binnen.
Weer een stapje verder ;)
In het nederlands ..
Na meer dan 24 jaar en 9 maand heb ik mezelf weer op laten nemen in de Nodelist als mailer voor Fidonet. Nostalgie, Historie. Sinds vannacht sta ik in de z2 daily vanaf volgende week in de nodelist
,2060,AroundMyRoom's_Mailer,Apeldoorn,Dennis_Slagers,-Unpublished-,300,CM,MO,IBN:fidonet.aroundmyroom.com
van 2:283/726.6 naar 2:283/548 en 2:283/549 naar 2:280/2060. Bereikbaar via fidonet.aroundmyroom.com via het binkd protocol. Op dit moment maak ik gebruik van de tool: fidian wat een aantal scripts onder Linux is en waarin ik weer gebruik maak van GolDED.
Mocht dit allemaal abacadrabra zijn: jammer, je hebt wat gemist. Fidonet bestaat nog zij het in zeer bescheiden vorm. Ik ben zeer benieuwd hoe ik eea weer aan de praat krijg.
Inmiddels is het me gelukt om netmail te versturen, me op een aantal echomail groepen aan te sluiten, maar de rest is nog afwachten want Fibian is daarin niet echt duidelijk helaas. Dus veel aan het proberen.
Deze weblog zal je meenemen in mijn pogingen om dingen aan de praat te krijgen ;)
Ik kwam net weer iets tegen mbt de historie van Fidonet.
Als Node, BBS beheerder heb ik ook nog rondom 1997 meegeholpen met de Algemene BBS lijst Nederland. En laat ik me daar nu niet weer zelf genoemd zien als medewerker ..
November 1997 ;)
Uit een iets latere ARJ archief bestand: ABN
“Helaas is Dennis Slagers per juni 1997 gestopt met het mede samenstellen
van de ABNlijst. Hij heeft zich in de periode dat hij meewerkte aan de ABNlijst heel erg ingezet om de ABNlijst te promoten (dankzij hem is de nieuwste ABNlijst nu ook altijd op de ISDN-pagina van Gertjan Groen op internet te zien!) en te verbeteren. Voor zijn inzet willen we hem van harte bedanken!”
Tekst die ik (denk) nooit gelezen heb omdat ik per 1-1-2000 stopte met het BBS