Fixing a broken L2TP VPN setup with Edgemax Edgerouter Lite

Taken from: http://www.dataguys.net/ubiquiti-edgemax-l2tp-setup/

it fixed my issues today #20-12-2016#

Show Running VPN Configurations

configure
#show l2tp config
show vpn l2tp
#show pptp config
show vpn pptp

Delete existing VPN Configurations

configure
delete vpn pptp ## possible this one does not exist so it will be told in your shell
delete vpn l2tp
delete vpn ipsec
commit
save

Now the existing VPN settings are removed

# change eth0 to whatever is the external interface port of the Edgemax
set vpn ipsec ipsec-interfaces interface eth1
set vpn ipsec nat-networks allowed-network 0.0.0.0/0
set vpn ipsec nat-traversal enable
set vpn l2tp remote-access authentication mode local

#Add local users for L2TP
set vpn l2tp remote-access authentication local-users username [myusername] password [mypassword]  ### do not use the [] in the command

# Set a range of IP addresses that are not being used by your LAN DHCP
set vpn l2tp remote-access client-ip-pool start 10.10.10.100
set vpn l2tp remote-access client-ip-pool stop 10.10.10.110

# Set the DNS servers to give out over DHCP for VPN Name Resolution
set vpn l2tp remote-access dns-servers server-1 10.1.1.50
set vpn l2tp remote-access dns-servers server-2 8.8.8.8

# Set the authentication mode for L2TP
set vpn l2tp remote-access ipsec-settings authentication mode pre-shared-secret
set vpn l2tp remote-access ipsec-settings authentication pre-shared-secret [secretkey]
set vpn l2tp remote-access ipsec-settings ike-lifetime 3600

# Set the l2tp listening address to the WAN IP and WAN Gateway
set vpn l2tp remote-access outside-address [Your-WAN-IP]
set vpn l2tp remote-access outside-nexthop [Your-WAN-GATEWAY-IP]

# Optional to set the MTU but I do this just in case they end up on DSL or T1
set vpn l2tp remote-access mtu 1492

commit
save
exit

Notice: firewall rules must also be enabled as ruleset in the Edgemax Lite, this is not yet in the document documented.

Please be noticed above text is derived from the URL above and used in my home setup. If it crashes I will be able to fix it.

Review: TP-Link Auranet EAP330

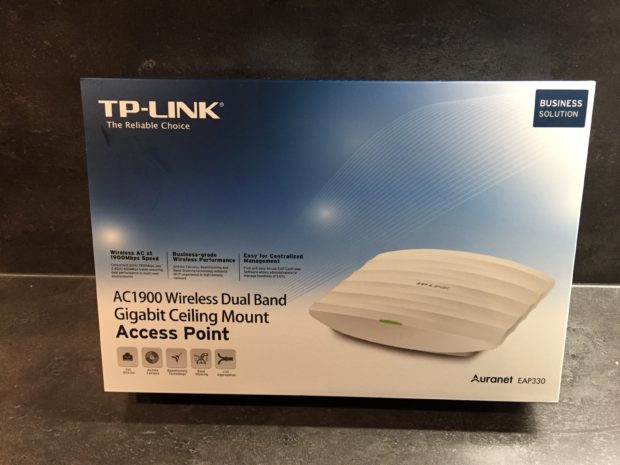
Ik heb tijdelijk de beschikking gekregen over de TP-Link AURAnet EAP330, AC1900 Wireless Dual Band Gigabit Ceiling Mount Access Point


img_0931

Ben je alleen geïnteresseerd in de conclusie:

Conclusie: ik was erg sceptisch over de kwaliteit en de performance van deze AP. Vooral omdat ik de indruk had dat TP-Link teveel naar de buren zou hebben gekeken. Om dat beeld te ontkrachten heb ik gevraagd of ik een set kon testen. En dat gevoel heeft het product geheel kunnen wegnemen.

Het gebruik van de AP is, na installatie, zoals je verwacht van een Pro oplossing en dat is wat je wilt hebben en waar je voor betaald.  Het product is stabiel en zeer snel. Beter zelfs dan wat ik heb ervaren met mijn eigen Unifi’s AP AC LR en AP AC Pro. Functioneel gezien doet deze AP absoluut niet onder voor andere professionele AccessPoints. De controller software mag wat mij betreft nog wat meer onder handen genomen worden om de gebruiker een betere gebruikerservaring te geven. Dit is momenteel voor mij nog een wat minder punt.

Prijs – Prestatie: uitmuntend

Zou ik deze in mijn eigen netwerk willen gaan gebruiken: zeer zeker.

Review:

De naam van de AccessPoint is Een hele mond vol om aan te geven dat deze AccessPoint uit de Business Solution range komt.  In ieder geval wel een oplossing die ervoor kan zorgen dat er eindelijk eens fatsoenlijk draadloos internet mogelijk is.

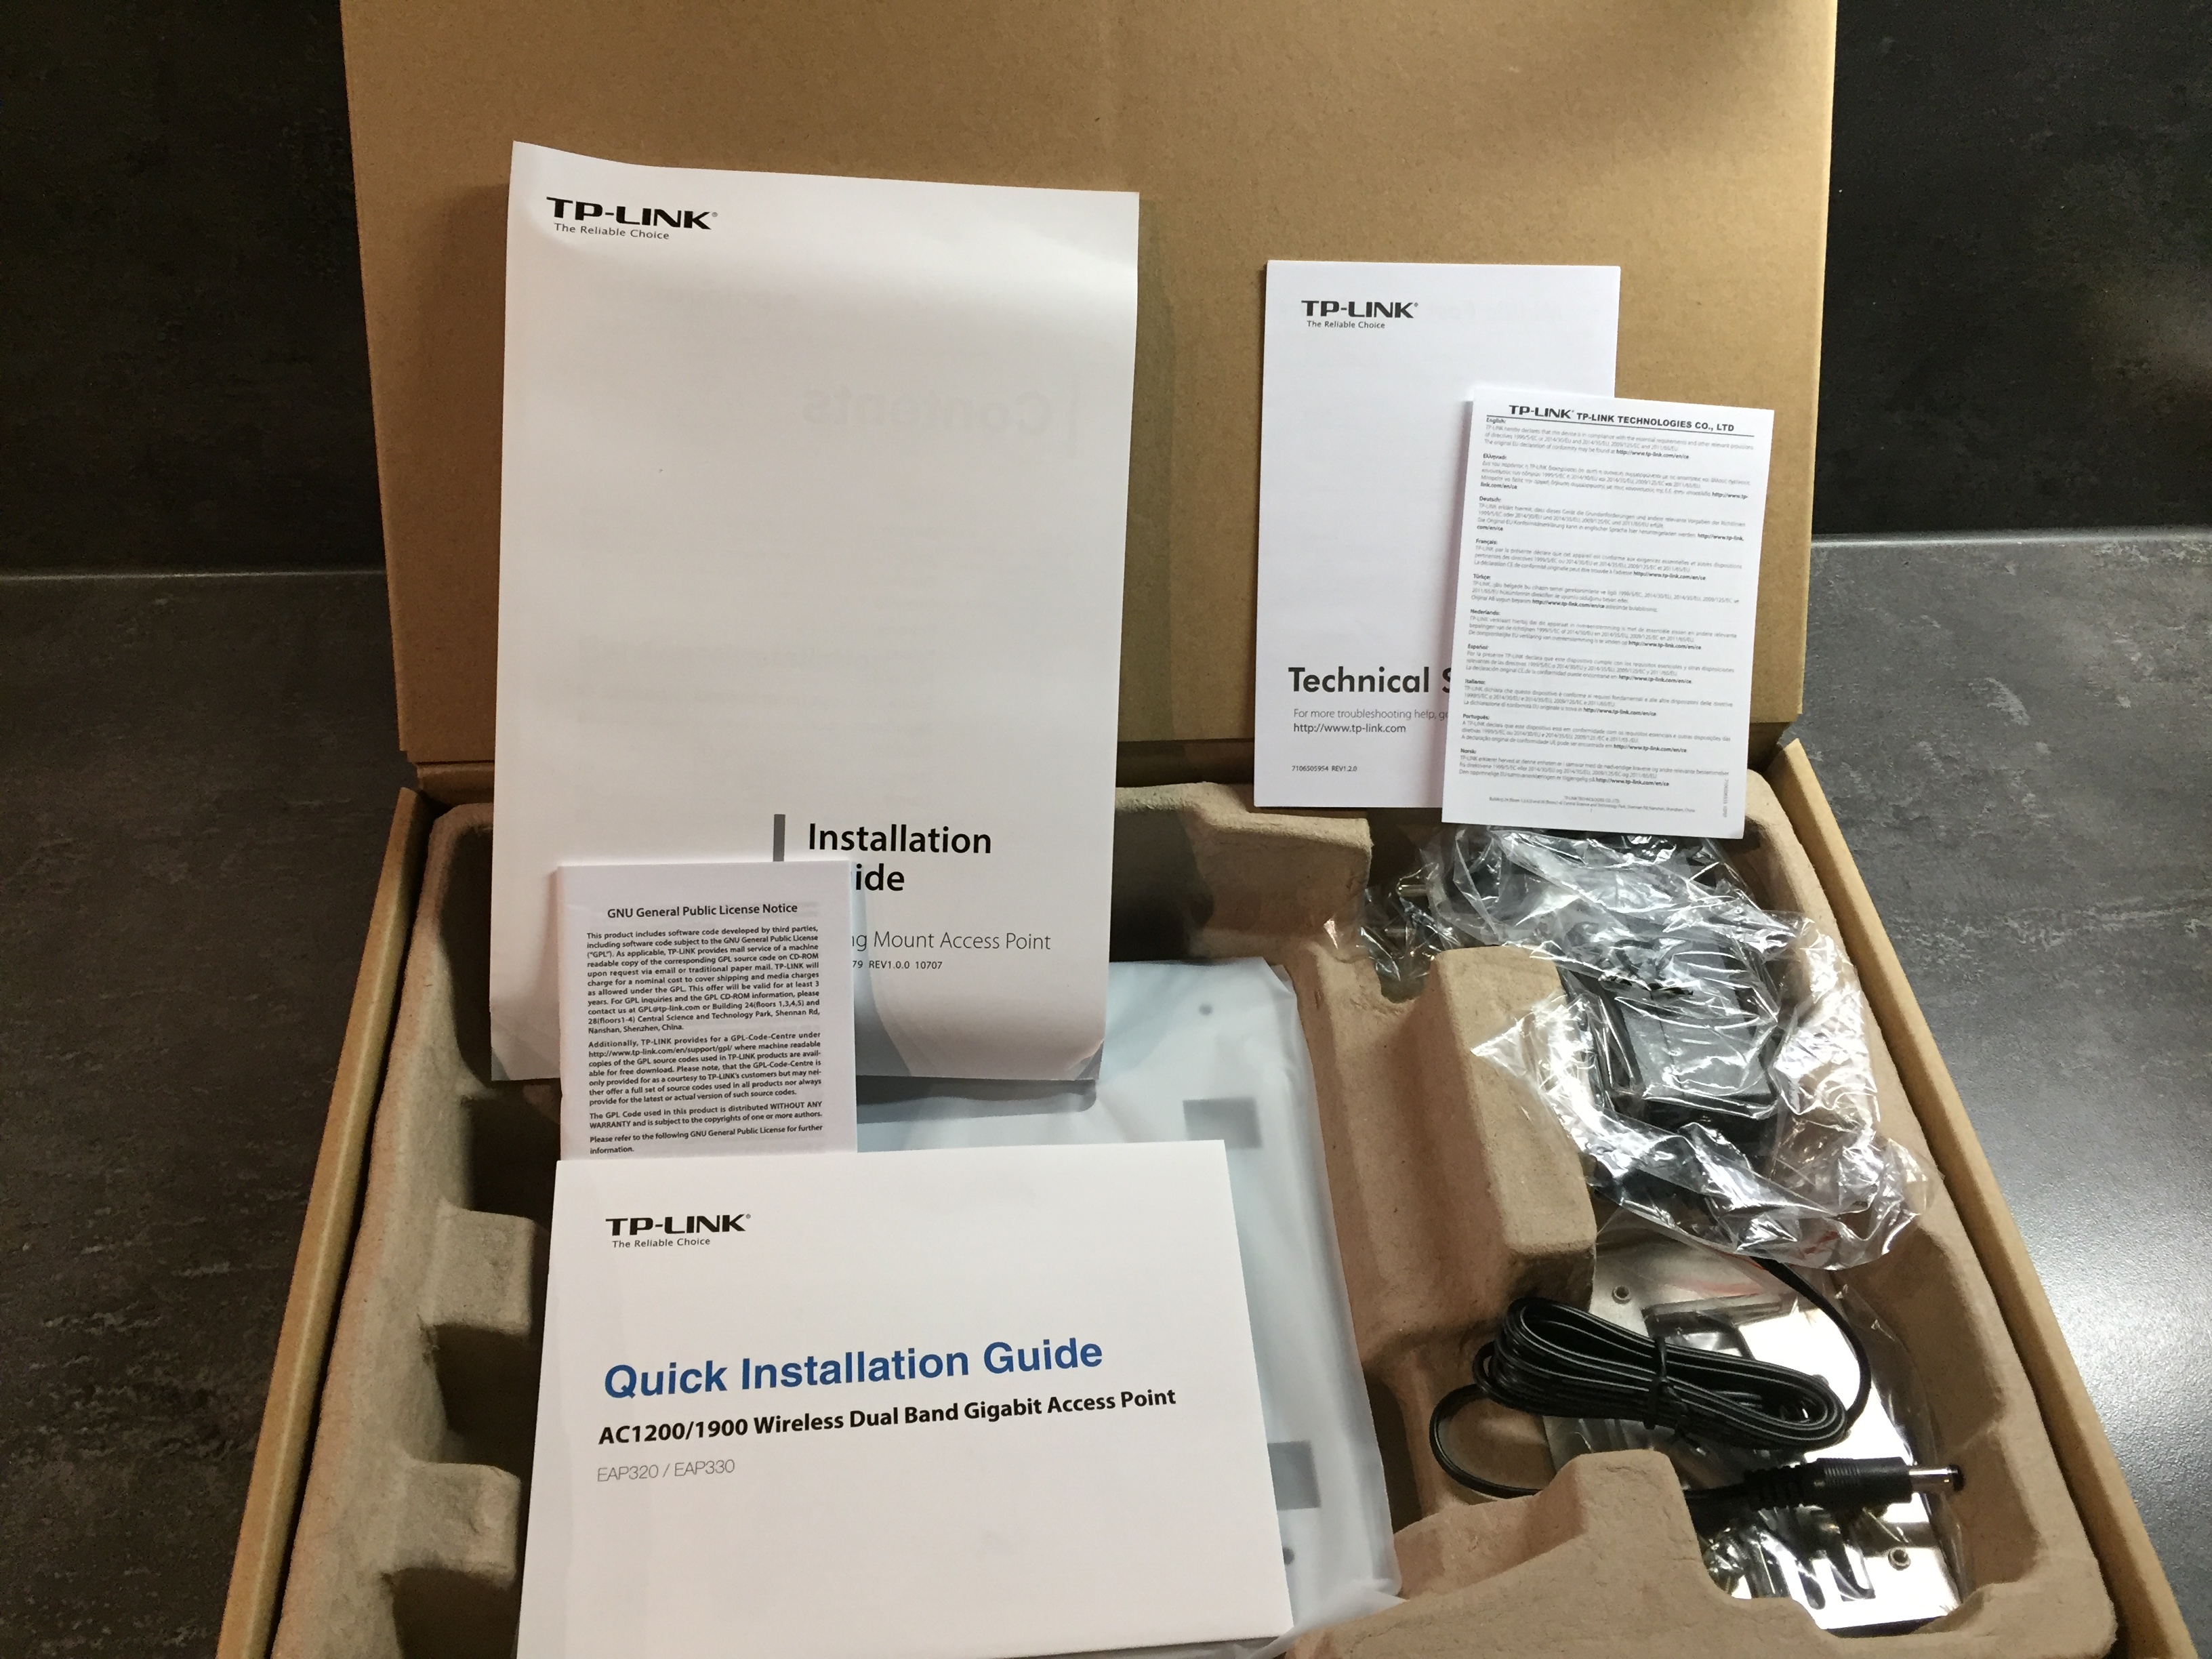
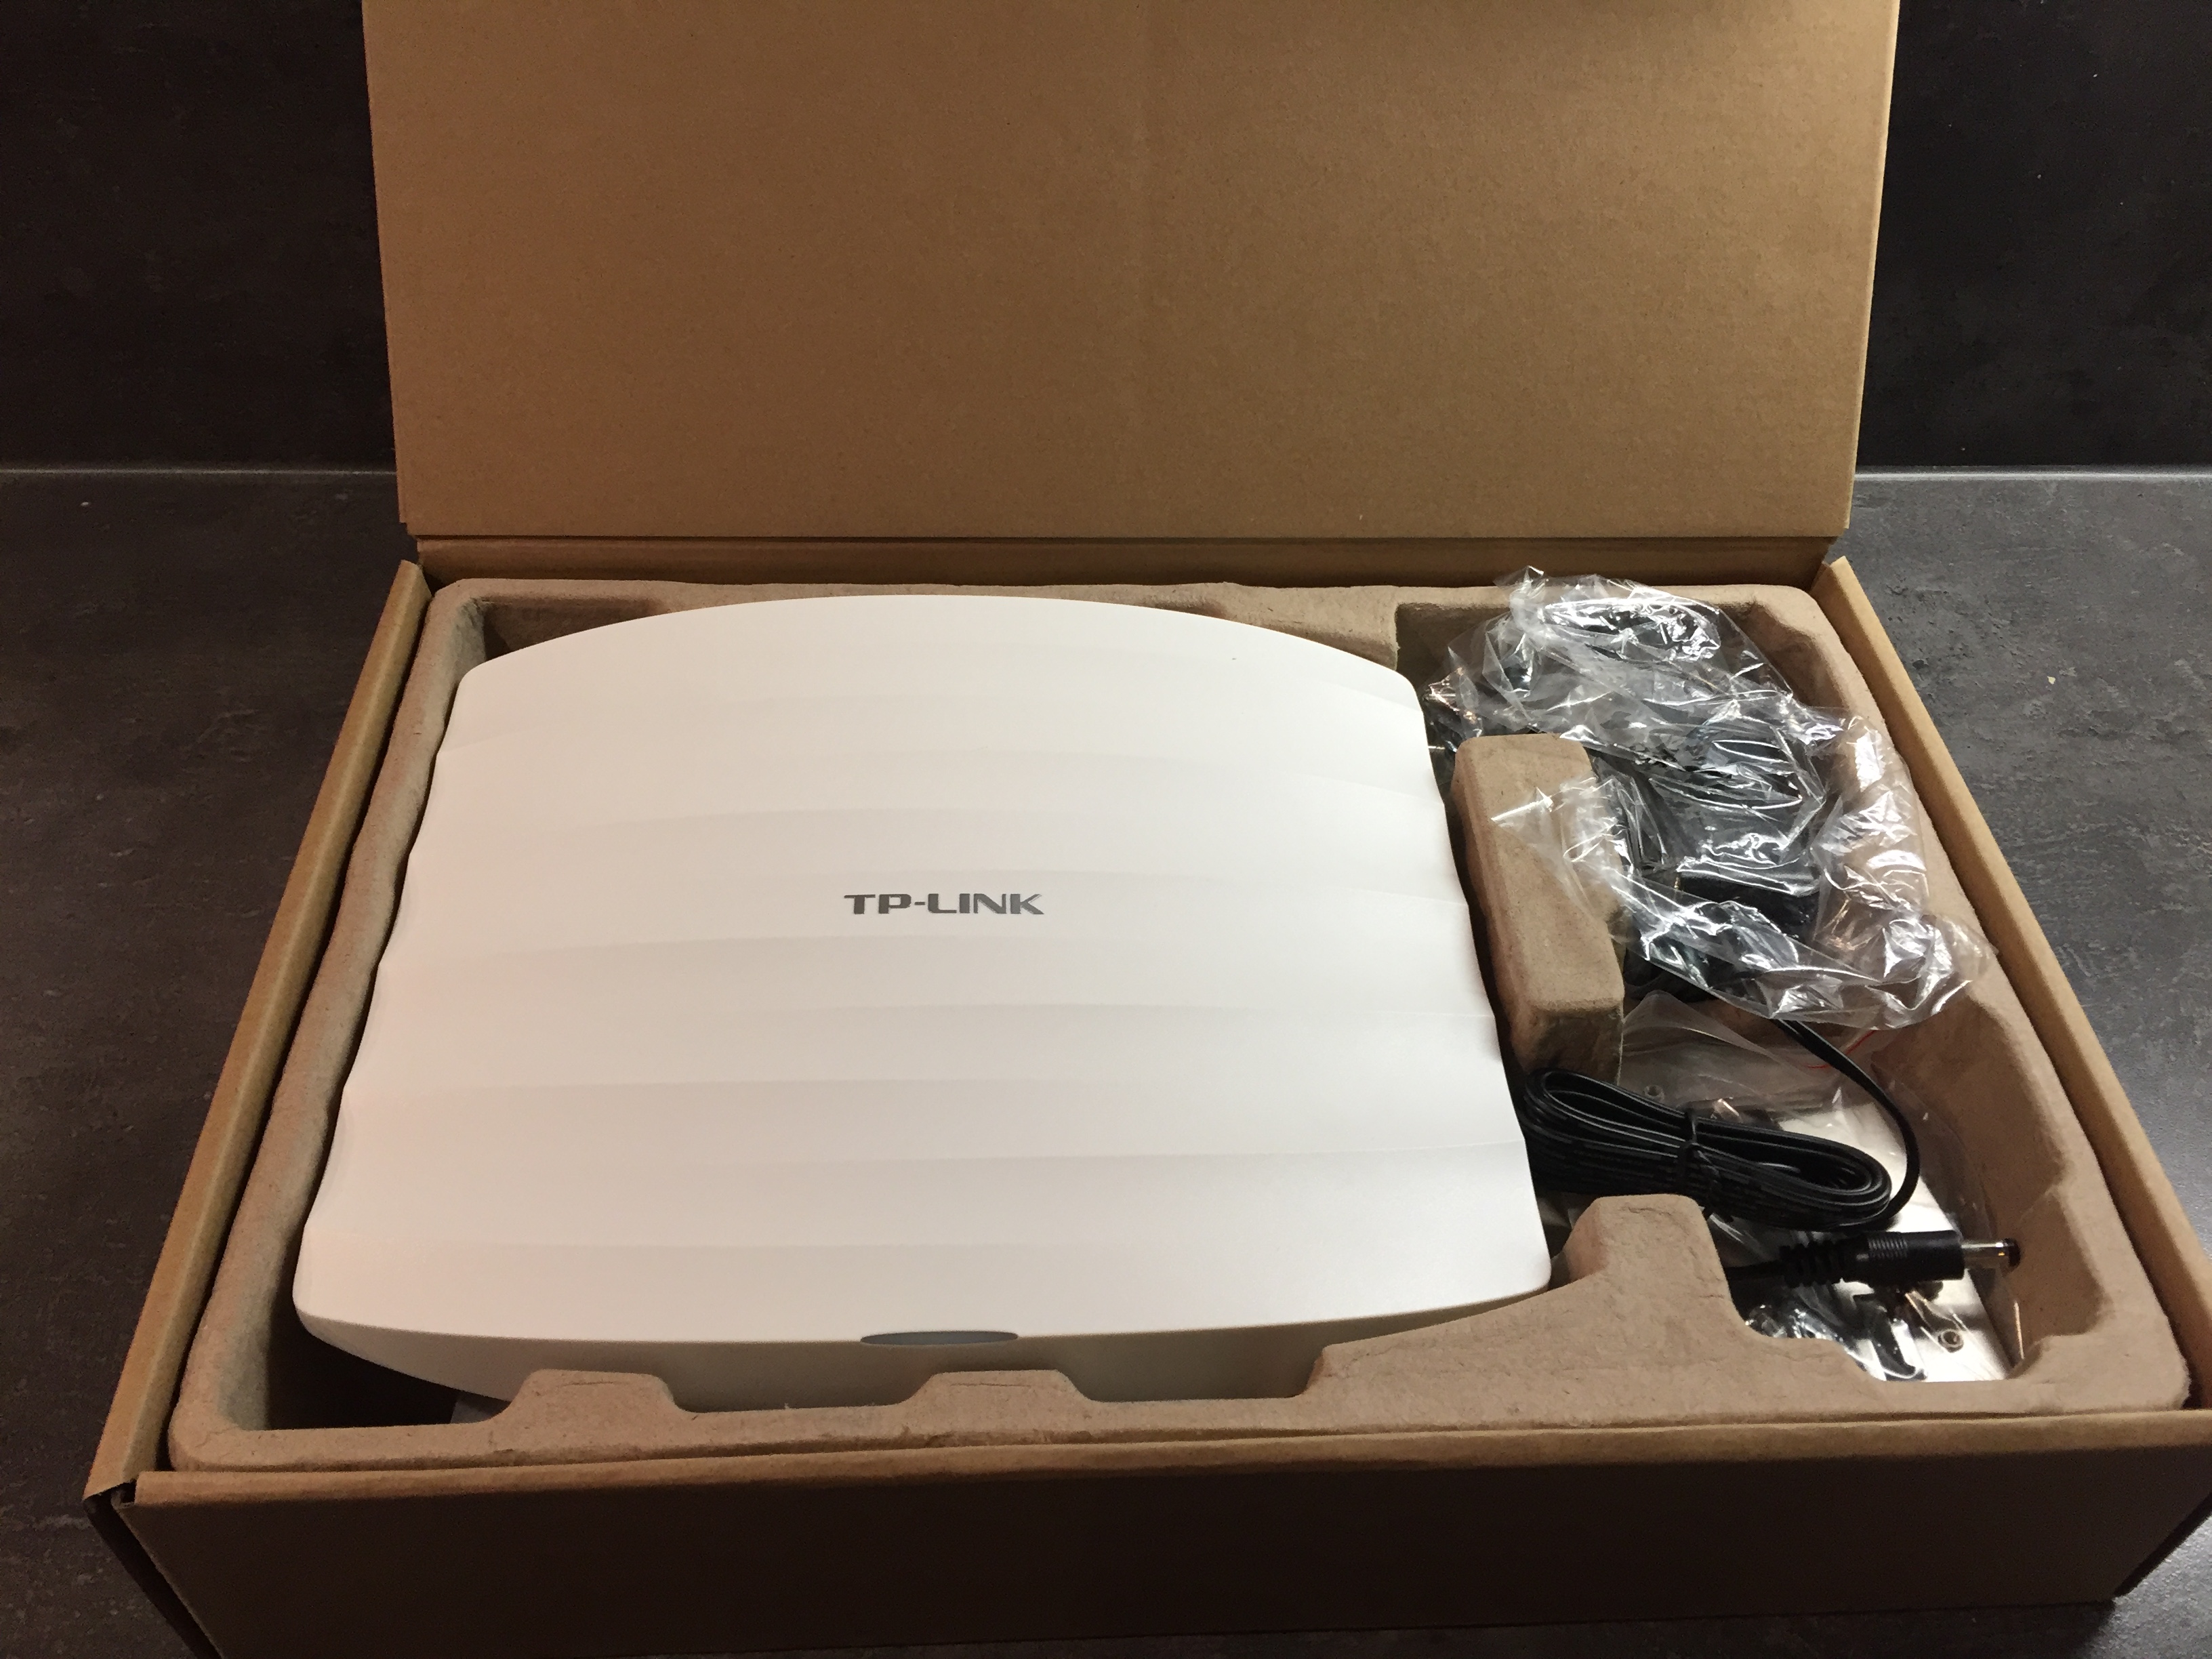
De doos bevat alles wat je nodig hebt om aan de slag te gaan met de AccessPoint

img_0933img_0932

img_0935img_0934


De kreet AC1900 komt voort uit een maximale snelheid van 600mbps voor de 2.4GHz (802.11n/g/b/a) range de 1300mbps is dan voor de 5GHz ( 802.11ac). Dit is een van de weinige accesspoint die de volledige bandbreedte voor wireless gebruikt, wat veelal ook aangeduid wordt als AC1900. Zelfs Ubiquity kan hier niet aan tippen. Deze heeft namelijk een schamele 450mbps op de 2,4Ghz. range zodat deze uitkomt op AC1750

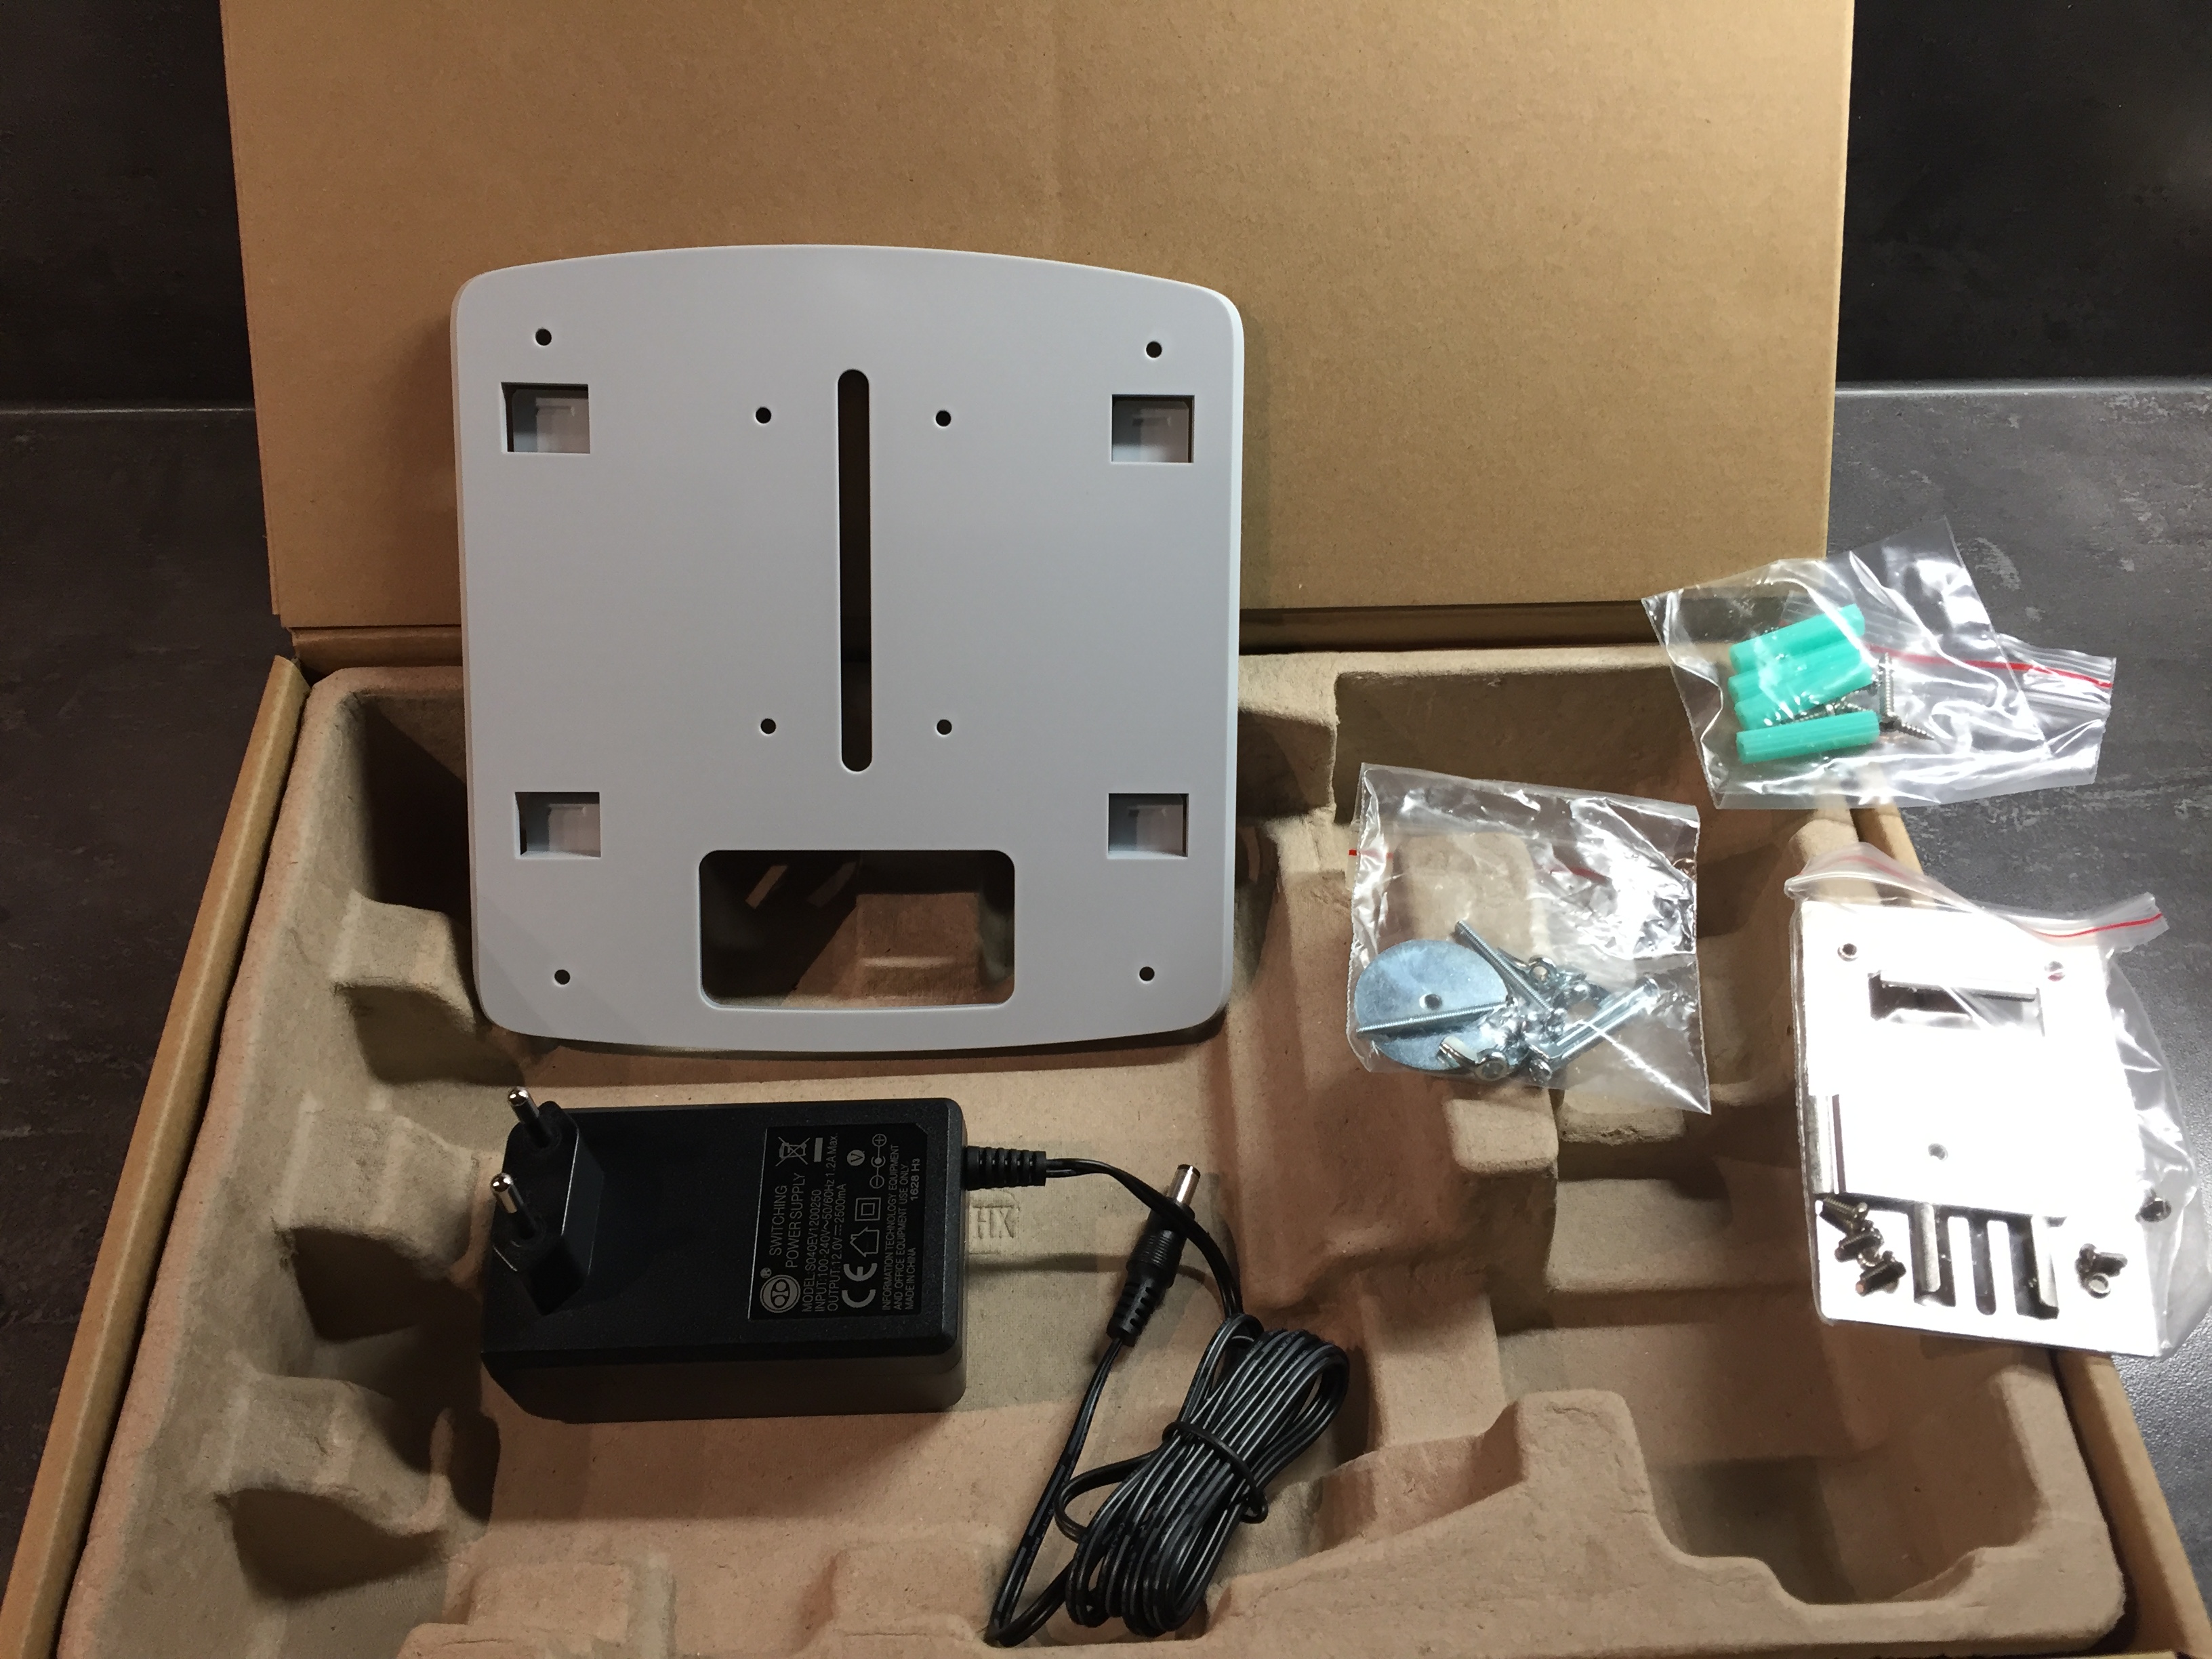
De doos bevat naast de AccessPoint een powersupply, muur en plafond bevestigingen en wat handleidingen.

Wat ontbreekt is een PoE injector welke aangesloten kan worden op de PoE netwerk aansluiting (ETH1). De PoE aansluiting is trouwens de standaard tot 48V (802.3at), je kan dus niet de 24V PoE injector van de Unifi AP Pro gebruiken. Deze laatste is namelijk niet de standaard.

Ik heb dan de AccessPoint ook met de powersupply aangesloten. Een Switch met PoE is in mijn thuisomgeving te duur en derhalve ook niet aanwezig. Dit onderdeel is dan ook niet getest.

In principe gaat het mij in deze test ook niet zozeer om de performance van de AccessPoint, Deze valt en staat namelijk met de verbonden clients. En ookal heb ik de beschikking over de DWL -192 van D-Link, die ook 1300Mbps aan kan, Wat ik met deze test wilde weten is hoe deze oplossing van TP-Link zich verhoud tot de Ubiquity Unifi lijn. Je ziet dat TP-Link geen concessies heeft gedaan op functioneel niveau.

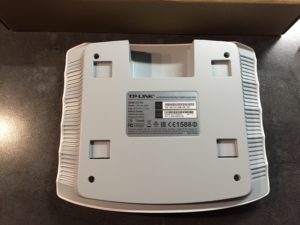
De AccessPoint is degelijk gebouwd, de behuizing is van staal/ijzer en heeft een plastic kap. De AP is zwaar en bezit zelfs een Kensington lock om deze ergens aan vast te maken zodat deze niet direct door iemand meegenomen kan worden mocht deze niet vast te maken zijn.

Aan de voorkant is een LED aanwezig die verschillende kleuren kan aannemen. Helaas is hier geen bescherming aan de zijkanten aangebracht zodat de LED doorschijnt door het plastic. Jammer.  De AP bevat aan de achterkant naast het Kensington lock ook een resetknop. De aansluitingen voor Power, ETH1 (PoE) en ETH2 (geen PoE) vind je ook aan de achterkant, maar dan wat meer naar binnen geschoven.

De AccessPoint voelt stevig aan. Losschroeven kan, maar de kap van de AP laat niet makkelijk los. Ik heb die poging maar opgegeven (bang om wat plastic te breken).
Later in deze review wat simpele eindgebruikers testen om te zien of de werking (gebruik en snelheid) van de AP voldoet aan de verwachtingen.

Software

Een belangrijk onderdeel binnen een business oplossing is de beschikbaarheid van een gecentraliseerd beheer systeem. TP-Link bied software aan: de EAP Controller software, geschikt voor: WinXP/Vista/7/8/8.1/10/Server2008  (32/64 bit) en Server 2012 (64 bit). Helaas geen mogelijkheid om de controller onder Linux te installeren (maar wat er niet is kan wellicht nog komen).

Bij het maken van de controller software is er goed gekeken naar de software van Ubiquity. Wat er onder de motorkap ligt is gelijkwaardig, de userinterface laat hier en daar te wensen over. Daar mag nog wel wat aan gedaan worden.

software

Grotendeels zijn de functies van de TP-Link controller gelijk aan die van de Unifi controller.

Wat ik wel super vind van TP-Link is dat ze de werking van de AP’s onafhankelijk hebben gemaakt van de controller software. Zo blijft een hotspot werken ookal is de controller software niet actief. (Dit in tegenstelling to the Ubitquity Controller software).

Ik schreef al dat de controller software nog wat beter mag,

Overal in de software is het zoeken wat je mag en kunt doen. Daarnaast is het pakket niet consistent. Je kan het MAC adres vervangen door een naam, maar als je dan een overzicht van functionaliteiten of iets anders voor meerdere AP’s opvraagt dan wordt niet de naam maar het MAC adres getoond, zo weet je nog niet met welke AP je bezig bent.

Gelukkig wordt er hard gewerkt aan de functionaliteit van de software om de hardware nog beter te kunnen ondersteunen

Wat ik miste was een handleiding van deze AP. Deze is er wel (zie link). Advies aan TP-Link: stop de PDF ook bij de zip / exe file van de controller software zodat deze direct meegeleverd wordt. Vele systeembeheerders denken vaak dat ze het beter weten dan iemand anders en hoeven geen handleiding te lezen. Die vliegen meteen naar de controller software en dan lopen ze vast en heeft de hardware leverancier het gedaan.

Helaas wordt uit kostenoogpunt veelal geen uitgebreide handleiding in verschillende talen meegeleverd. Iets wat gemeengoed is en dus niet iets wat alleen TP-Link doet.

Het adopten van een AP is trouwens een crime. (als je de handleiding niet leest). De foutmeldingen die je te zien krijgt zijn niet simpel te herleiden. Er wordt namelijk om een gebruikersnaam en wachtwoord gevraagd. Je denkt dat het de gebruikersnaam of wachtwoord is van de software, maar het blijkt uiteindelijk admin/admin te zijn wat achterop de AccessPoint staat. (duh .. )

Nadat de AP opgenomen is in je beheerstool worden de instellingen naar de AP gebracht.

Op de doos staan prachtige unique sellingpoints. Daarover kun je discussieren. Ik vind dat bij een business oplossing het niet noodzakelijk zou moeten zijn of hoeven te zijn dat een AP de functie heeft dat deze op gezette tijden automatisch gereboot kan worden.  Vooral omdat dan beter de stabiliteit gegarandeerd kan worden. Mja ..  Ik snap de marketing filosofie erachter, voor een consumenten oplossing een nuttige functie, maar niet voor een business oplossing. Maar je kan het gebruiken, het hoeft niet.

AccessPoint

De AccessPoint krijgt een IP adres en heeft ook een ‘fall-back’ IP adres zodat je de AP kan benaderen zonder dat deze is opgenomen in je netwerk. Zolang de controller software niet draait kun je in de webinterface van de AP terecht. Is deze opgenomen in je netwerk dan moet je met het admin wachtwoord van je controller naar de webinterface. De interface van de AccesPoint is helder en duidelijk. Niet dat je deze vaak nodig hebt, maar in tegenstelling tot de controller software vind ik dit vele malen beter.

Hotspot

Ook op functioneel niveau heeft TP-Link goed gekeken naar Ubiquity, de Hotspot functionaliteit is hier ook te vinden, aan te maken en te gebruiken en werkt exact zoals het bij Ubiquity werkt. Een mooi voordeel van de TP-Link versie: de hotspot functie blijft werken zonder dat de controller software actief is. Wanneer de configuratie deployed is dan neemt de AccessPoint de taak van de controller software over. Dat is dus beter geregeld dan bij de Unifi controller software welke moet blijven draaien.

Specifieke functionaliteiten

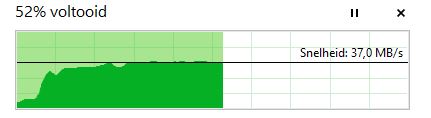
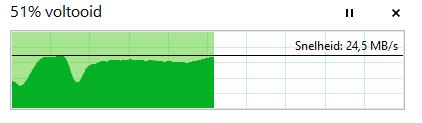
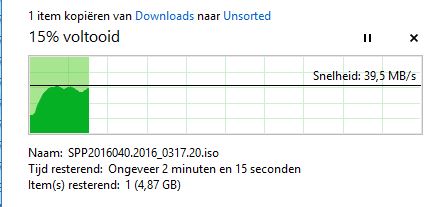
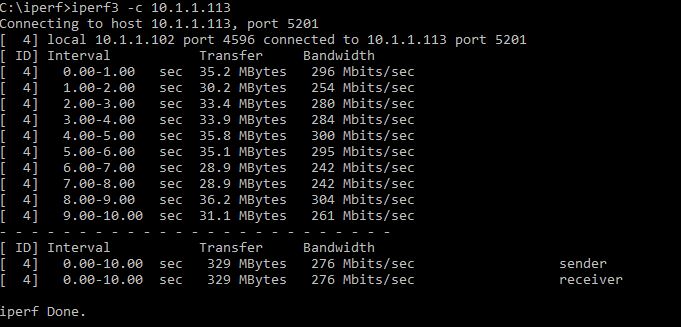
De performance van de AP is buitengewoon goed te noemen. De performance zoals ik hem kon meten was beter dan de Unifi AC Pro

37 MB/s lezen t.o.v. 27MB/s voor de AC Prosnelheid_lezen

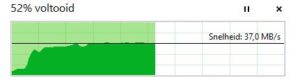
En het schrijven scheelt ook zo’n 6 tot 8MB/s

shelheid_schrijven

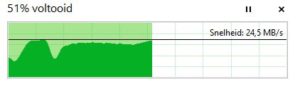
Wel een kanttekening: ik was niet in staat om de Unifi AC pro op de exact dezelfde plaats te testen. De TP-Link is gewoon sneller. Wel is de schrijf en leessnelheid van de Unifi AC Pro wat stabieler. Ik zie daar wat minder fluctuatie.

De datadoorvoer kan hoger zijn, dit is geheel afhankelijk wat voor soort type protocol je gebruikt. Zo geeft Samba (Windows File Sharing) een andere performance dan FTP of NFS of andersoortige doorvoer testen. In ieder geval ben ik zeer tevreden met het totale resultaat.  Ik heb zowel 2,4Ghz en 5Ghz getest en de snelheden waren goed tot zeer goed te noemen. Wel zal de snelheid vallen en staan met omgevingsfactoren en gebruikte clients die zich aanmelden op de AccessPoit

Wanneer de AP in een drukke omgeving gebruikt wordt in combinatie met meerdere ‘broetjes of zusjes’ dan zijn de onderstaande functionaliteiten ook bruikbaar. Al is het afhankelijk van hoe de situatie is wat je zou willen gebruiken.

Heel goed is de Load Balance feature om te bepalen hoeveel clients er maximaal verbonden mogen worden en wat de kwaliteit van het signaal moet zijn om jezelf erop te kunnen verbinden.

Trunking is mogelijk omdat er 2 Ethernet poorten erop zitten en de AP hier functionaliteit voor bied. Maar ik vraag me af waarom iemand dit zou gebruiken als je toch niet het maximale uit een gigabit verbinding kan halen. Wellicht dat iemand dat kan uitleggen

Om boefjes tegen te gaan is er ook support voor ‘Roque AP detection’ .. een niet geauthentiseerde AP wordt dan gedetecteerd en uitgeschakeld.

Prijs

De prijs van dit setje ligt zo rond de 150 euro, gelijkwaardig aan de Unifi AP AC Pro.

TP-Link probeert met deze set en prijs alles uit de kast te halen op Wireless gebied. Ik denk dat ze daar goed in geslaagd zijn. Zou de controller software een meer eigen gezicht krijgen, zodat het minder lijkt op de concullega, dan is het nog meer een zeer goede keuze dan wat het al is.

OpenSource

Meegeleverd is een boekje met licentie informatie over GPLv1,v2 en v3. Helaas ontbreekt informatie over welke onderdelen dan vallen onder deze licentie en ik vraag me af of er niet andere licentiemodellen ook nog gebruikt wordt. De SourceCode is in ieder geval te downloaden van de website van TP-Link.


Disclaimer:

ik ben geen medewerker van TP-Link. Wel ken ik medewerkers van TP-Link Nederland welke in een vorig leven collega’s van mij waren,  echter ben ik objectief en geef mijn eigen mening.  Ik ben tevens niet betaald voor deze test. Zelf bezit ik de Ubiquity Unifi AP series en had een gezonde interesse in deze TP-Link serie, vandaar dat ik de beschikking kreeg over een setje EAP 330 om te testen

De client waarmee ik heb getest is een DWL-192 USB 3.0 Wireless van D-Link.

Apple, hoe zit dat nu als ik een app Koop / Download?

Apple,

Sinds kort krijg ik het volgende te lezen als ik een App koop uit de Apple Store:

“Bevestiging”

“Ik ben me ervan bewust dat ik de aankoop niet meer kan annuleren als ik deze app download binnen veertien dagen nadat ik op ‘Koop’ heb getikt.

Euh ..

Bedoel je hier nu dat ik, als ik op koop tik en de app download de app niet meer mag annuleren?

Bedoel je dat ik 14 dagen de tijd heb om de app eventueel te downloaden en als ik dat doe dat ik het dan niet meer kan annuleren?

Bedoel je hier dat als ik druk op koop dat ik het dan wel mag?

Of bedoel je gewoon dat ik 14 dagen de tijd heb om te annuleren wanneer ik op koop heb gedrukt en de app heb gedownload?


Dear D-Link, Alpha Networks, Realtek .. I own a DWA-192 and I get satisfied

Update 15-11-2016

I have added extra options to the SMB configuration of Openmediavault

In a last test I got almost 5.5 tot 5.75MB/s downloading data from my NAS to my Win10 notebook.

By adding these ‘options’ my speed improved with almost 600% from 5MB/s to 30MB/s

max protocol = SMB2
max xmit = 65535
socket options = TCP_NODELAY IPTOS_LOWDELAY SO_SNDBUF=65535 SO_RCVBUF=65535
read raw = yes
write raw = yes
max connections = 65535
max open files = 65535


Update 21-08

I am getting (its wierd) more satisfied, now the Wireless is stable and I do random tests

First of all I was testing PC Windows 10 –> Debian Linux, so a write action, my rant was about the write speed. But actually I think I cannot be complaining a lot when I achieve 20 to 30MB/s  write speed .. ? can I?

Today I tested a read speed from NAS (Debian with OMV, (OpenMediaVault)) and here I get speeds between 40 and 45MB/s ..  so .. although I would like to have faster write speeds, the read speed is showing expected speeds.. .


original rant  below;-)

…..

First of all .. I am geek, like to test, read manuals (not user manuals but engineer manuals or technical manuals) to find and read about settings to see how they can be finetuned for optimal results.

Maybe it’s due to myself, but why is there not a decent manual for the DWA-192? settings explained? best settings used … documentation is dramatic.

Last week I bought a DWA-192. It’s being used in The Netherlands under Windows 10 and I am testing towards a HP Microserver running VMWARE with a host running Debian 8. Normal speeds on Gigabit copper wire are around 78 to 80MB/s

The speed advertised for the DWA-192 within Windows 10 is between 1.1 and 1.3Gbit/s with this I expect at least speeds between 300 and 500mbit/s, but I achieve much lower (180 / 220mbit/s)

update (one day later): due to just wait .. and maybe time of test I see better results. Speed is improved towards 250 to 300 mbit/s

My AP environment consists of 3 APS’s

  1. Ubiquity AC LR in the attic
  2. Ubiquity AC LR 1st floor
  3. Ubiquity AC Pro living room (the DWA-192 is connected to this one). I know that I get much lower speeds when using 1 or 2 but I am using it at 3 .. and expect the full potential ..

The notebook is 4 meters next to the Ubiquity AC Pro. I have a good wireless connection (Images will follow) due to the wireless connection speeds of 1.1 and 1.3Gbit/s

Dear D-Link, please request your engineers at Alpha Networks that they will contact Realtek to see how interoperability between AP’s can be improved. I really like to help to test, things I did many years.

There are a few things:

  • the advanced settings in the network driver are not described, So it is a needle in a haystack to see what are the best settings (I did test a lot of settings and see various results
  • Enable / Disable QoS shows dramatic changes in performance
  • default using the WLAN on auto rather than choosing 802.11ac or a combination of both is causing the DWA-192 not to connect to its max speed, only Wifi speeds: 450 or 600 (if lucky), forcing the device on 802.11ac/n/a is showing higher speeds ..
  • Windows SMB copy shows around 20 to 30MB/s at a connection speed of 1.3Gbit/s this is ‘dramatic’ I am expecting here 45 to 60MB/s
  • Update: SMB is also improved to max 40MB/s

smbcopy


  • iperf used between my Windows 10 and linux box is showing between 170mbit/s and 220mbit/s which is in line with the Windows SMB copy

iperf3_1

update: iperf3 is showing ‘higher’ results now to max 300Mbit/s  .. but still not a 400 to 500Mbit/s I am expecting.

Of course I would like to fingerpoint towards Ubiquity’s  AP but I have seen that other AP’s can achieve higher results towards the Ubitquity’s AC Pro device

Of course specific settings like using VHT80 etc are set otherwise the connection speed could not achieve 1.1 or 1.3Gbit/s

So how to achieve a higher throughput speed, something I am seeking.

Anyone?

b.t.w. Altough speed is not everything, the wireless is absolutely stable !

Weatherstation and TE923 USB issues on a Raspberry Pi

I am using Weewx to read data from my weatherstation

But once in a while I have issues:

  • starting the driver / python app
  • after x days no data is being collected (and not being ftp-ed) and a restart does not function

I used the standard release of Weewx 3.5.0

Lucky there is a fanbase and group on google groups where  you can ask questions.

This weekend I upgraded my TE923 driver to  version: 0.18rc8. (meanwhile (22/7) this version is released as 0.18) This version can be found in the github repository and it seems to me that this version is solving some issues I had, but at time of writing I am still testing.

With this new driver I had also to make some changes to that driver and to my Raspberry Pi.

  1. I modified the TE923 Python driver: I commented this line out:
     self.devh.reset()

    (somewhere around line 1530, this caused the message that the USB part was not being claimed by python. (in previous driver versions this was not being reported, so it has to be something in the driver causing this. By commenting this line out, it is making sure that there is no ‘fake reset’ of the usb part. (Note: I did not test what will happen if I am using this line again in combination with the 2nd modification / addition I made).

  2.  and I found a special line for the Raspberry Pi to init the USB for usage with the TE923 driver:

sudo nano -w /etc/udev/rules.d/99-te923.rules

add this line:

ATTRS{idVendor}=="1130", ATTRS{idProduct}=="6801", MODE="0660", GROUP="plugdev", RUN="/bin/sh -c 'echo -n $id:1.0 > /sys/bus/usb/drivers/usbhid/unbind'"

and save it
with

udevadm control --reload-rules
you reload the settings

now stop / start weewx again (/etc/init.d/weewx start / stop / start etc..

Update: 1 week after I wrote this the weatherstation stopped responding again ..
Cause: the SD card had no space left.
here a tip: if you use raspbian, make sure your whole SD card is being used. My Linux install was not extended with the option in the raspbian config. This options allows you to use the whole SD card size

use raspi-config and use the option to expand the filesystem


Update 2:

Server has more than 51 days of uptime… and still running smooth

Update 3:

Server is now up for 147 days. Due to some own power stuff and relocations I had to stop it for a while
but still happy that it is running smootly


HP Microserver Gen8 G1610T booting with USB & ODD

I have 3 4 HP Microservers and 2 3 of them are running OpenMediaVault

I want to use the 4HDD’s of the Microserver soley as Data disks and not the OS. For this you have options:

Boot from SD card, boot from USB (internal) and than use the Datadisks. The problem here is that it is not wise to have many write actions to a SD card or USB thumbdrive.

To solve this issue: I use an old 2,5″ HDD connected to the ODD port. (ODD power cable & internal free SATA port)

To be able to boot from the 2,5″ HDD you need a number of items

  1. Sata Cable
  2. OKS-38523 (SATA Floppy Cable)  (€ 3,99)
  3. USB Thumbdrive (preferred 2 if you do not use a SD card)
  4. 2,5″ HDD (or SSD)

Size, in this, does not matter.

First connect the hardware (cables & HDD), do not insert the SD card or USB thumbdrive, do not insert the 4 Data disks (SATA) yet.

Make sure you use AHCI mode for the disks, the RAID module of HP cannot be used.

Install the OpenMediaVault ISO on the SD card, than make sure in the BIOS of the HP Microserver you can boot from it when starting the device. Insert the SD card in the slot and boot, install Openmediavault, it will detect the 2,5″ HDD

After installation: remove the SD card, Openmediavault will boot. Please remember: the 4 DATA disks are still not inserted. If you do so: OpenmediaVault will not boot, insert the USB Thumbdrive to the internal USB port.

Make sure that SSH is enabled within OpenMediavault or that you have access to the shell.

Below installation is derived from this german manual

in the GUI of OMV you can find the installation point of the USB drive, in my situation: /dev/sdb

Clean the disk with the command:
dd if=/dev/zero of=/dev/sdb count=1000

Make a bootable partition (very important to make it bootable in the interface !!)
cfdisk /dev/sdb

and do format it. (I formatted it as ext3)
mkfs.ext3 /dev/sdb1

mount /mnt /dev/sdb1
update: it is possible that your new debian version need to mount the device as ‘mount /dev/sdb1 /mnt’
I had this issue when I was installing OMV 4.x (updated: 11-04-2018 /dd/mm/yyyy)

Install grub:
grub-install –no-floppy –root-directory=/mnt /dev/sdb

Please note (when printing this: before no-floppy is dash dash (- -) (same for root-directory) and there is a space after /mnt[space] /dev/sdb

Find the device.map in /mnt/boot/grub, it is possible that you do not have it, than read further. cause than this part does not apply. (with latest debian installations it is not necessary anymore). But in my initial OMV 3.x installation I had. So If you have a device.map check the boot order:

(hd0)   /dev/disk/by-id/ata-Samsung_HDD_840__500GB_S3C6NSBD57N
(hd1)   /dev/disk/by-id/usb-_FreeCom_Memory_05B209083439BC14-0:0

Make sure you switch the boot order
(hd0)   /dev/disk/by-id/usb-_FreeCom_Memory_05B209083439BC14-0:0
(hd1)   /dev/disk/by-id/ata-Samsung_HDD_840__500GB_S3C6NSBD57N

Activate Grub:
grub-install –root-directory=/mnt /dev/sdb

Please note (when printing this: before root-directory there is a dash dash (- -) and there is a space after /mnt[space] /dev/sdb

grub-mkconfig -o /mnt/boot/grub/grub.cfg

Turn off the device, insert the 4 SATA disks and boot

01-08-2016 I’ve updated the info after noticing a missing mount and the dashes and spacing was hard to see when printing this ;-)

PGOffline & MySQL

For many years I am using PGOffline, a tool to get all the content from yahoogroups.

PGOffline was using up to version 3 an Access Database but with the release of version  4 they went to an SQLite database.  Here came my problem.

For years I was inserting the data from the Access Database into an MySQL database so that with an PHP script I could search through more than 100.00 messages.

But after PGOffline went to SQLite I had an issue cause my ODBC connection was not working anymore. Due to some change in PC’s and notebooks I lost my access database with the ODBC and Queries as well (damn .. )

Altough the mailinglist is not that active anymore, there were some 6000 messages submitted in around 1,5 to 2 years. and I want to have them inserted in the MySQL database still ..

The issue I had was that the SQLite database of PGOffline contains a BLOB (Binary Object)  with the message and is not ‘simply’ readable.

for months I was trying and there was no solution for me to fix that. Until last weekend. And actually it was pretty easy. And I fixed it ..

1. Microsoft Access

2. Make sure you have access to your MySQL database and able to connect to it (do check my.cnf for the bind address (if you are on Linux) make sure you can connect to it from other machines) and make sure the firewall does not block its port (which I noticed after 15 minutes of trying or so)

3. install MySQL ODBC drivers in your environment

4. install SQLite ODBC drivers in your environment

In Access make sure you link to the database with linked tables.

the SQLite database is just the file. In my example its on the same computer as the Access database

The issue I had with the SQLite database and its linked tables was that the ODBC driver did not allow me to search with wildcards (select * from person  where person is like ‘a%’) . To make sure I have all subscribers I made an update query to a local table with all the persons, but in fact that is not needed.

Than I made sure I could read the messages

with this query: ‘StrConv([content],64)’ I was able to decode the BLOB.  and with some other InStr queries I removed the beginning and end of the start of the message as this is ‘garbage’ not needed, I added some HTML breaks.

Finally I created an update query inserting all the new messages from the SQL database not in the MySQL database, I even found that very old messages were not imported at all they were forgotten, now they were inserted as my Query statement request to insert all YahooMessageID’s not in the MySQL database ..