Een berg veranderingen

Sinds 2013 draaide deze weblog op een server en sinds vandaag draait ie op een nieuwe server.

Reden: OS verouderd en Plesk kon daardoor niet meer een update krijgen. Verder draaide de server nog zeer goed. Maar upgrades brengen ook mooie nieuwe dingen met zich mee. Makkelijker met certificaten werken en de migratietool ging ook als een speer.

Tevens vandaag WordPress maar weer eens eens een upgrade gegeven zodat ik weer heerlijk een weblog kan schrijven. Sinds eind 2000 begin 2001 zijn we daar al mee bezig. Een dikke 17 jaar .. Wow. De tijd gaat hard en we gaan zien of 2019 iets meer updates met zich meebrengt.

Calibre, Calibre-Web with a network share

A lot of people do report issues with the Calibre database when the database is on a NAS or network drive. Last week I had issues with Calibre-Web and the validation of the database when Calibre and Calibre-web do maintenance on the database.

People get: “CantOpenError: CantOpenError: unable to open database file”

Within the comments the git repository of Calibre-web I got a hint.  and that solved my issue
a number of years I was running a 13K ebook database, but I was never satisfied. Adding books was almost impossible without syncing, copying books, move the database and messing up the database with duplicates. Terrible.

Last week the database was not able to fix itself anymore and I decided to start over with only those books I really like or wanted to keep. And I wanted to fix the database issues.

To fix it, you must be able to run a NAS or (virtual) Server with SAMBA version1 (NT1).  As I am running VMWARE a new Linux Server was built quickly. Please be noticed that I do not care about security in my home network on that machine and for that purpose.

Import configuration steps in /etc/samba/smb.conf

[global]
min protocol = NT1
max protocol = NT1
client min protocol = NT1
client max protocol = NT1
# this will run samba in Samba Version 1 mode.

[share]
force user = [a-username]
path = /var/www/html/books
writeable = yes
browseable = yes
guest ok = yes
guest account = [a-username]
create mask = 0777
directory mask = 0777
oplocks = false
level2 oplocks = false
# Especially the oplocks on false are needed. If not Calibre-Web will not get access to the database if Calibre is using it. If that happens your database can be corrupted again very quickly.

If you run Calibre under Windows 10 make sure you add SMB1 support through the ‘features’ option this is disabled by default.

I started with 400 books and now I added 520 books in many sessions without any open database issue.

Using the oplocks on false could be also a solution when using SMBv3 or SMBv4 but I did not try that.

Please also notice that the writer of Calibre does not suggest to use a network share and it is known that for some it is working fine and for others not. This blog items could lead to more solution(s). Even it is not supported ;)

Rsync config with MailinaBox gives: invalid literal for int() with base 10: ” message

Mail in  a Box (mailinabox) can backup its mail with rsync to a destination of your choice. When it was working but your target backup machine has been changed suddenly mail in a box comes with the message: invalid literal for int() with base 10: ”

You checked, double checked your settings and they are all ok .. but still the above message. The reason is that Mail in a Box keeps a record of your SSH keys to protect itself:

messages like:  WARNING: POSSIBLE DNS SPOOFING DETECTED!  and

The ECDSA host key for [my.box.org]:22 has changed,
and the key for the corresponding IP address [target.ip]:22 has a different value. This could either mean that DNS SPOOFING is happening or the IP address for the host and its host key have changed at the same time. Offending key for IP in /root/.ssh/known_hosts:7

Normally this is good behaviour but now you need to have fixed this: its easy with this command
ssh-keygen -f “/root/.ssh/known_hosts” -R [my.domain.name]:port


VLAN for Guests with Ubiquity: Unifi USG, USW8-150, AC-Pro, AC-LR and other stuff

This posts is merely an overview of what I did to get my WLAN guests, who access the Internet through the hotspot feature of the USG and the Unifi controller,through a VLAN so that they are not part of my own private network. (security)

This handout only applies when you own some gear of Ubiquity. (I have also other hardware, here you might have to make some configuration as well, my situation is explained.

What hardware is in the network
USG Router – US 8-150W switch – AC-Pro, 2 x AC-Lite AccessPoint (Unifi stuff)
1x TP-Link TLSG108E (Smart Switch)
2x Dump switch 5 port Netgear (not important in this story)
1x TP-Link TLSG2216 (Smart Switch)

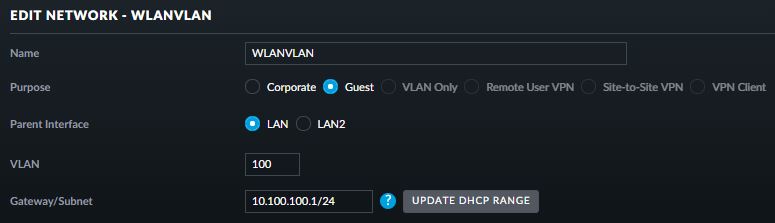
1st Create a guest network with VLAN100. Do this only if you have the USG. If you do not have an USG this does not apply cause the network part in the controller is for use with the Unifi USG router.

If you use “Guest” it is already isolated from your corporate LAN.
Modify other settings like DHCP in this menu. This I do not explain.

Now make sure your SSID for your guests can be on a VLAN

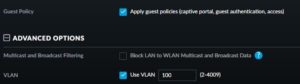
This is the most important part.

Notice: I have an US-8-150W. When creating a VLAN Guest network in the profiles part of the controller the ports will be configured automatically. As long as you have all profiles accepted on the ports, the VLAN will directly work if your AccessPoint is directly connected to the Unifi Switch.

In my situation I have 2 AccessPoints behind a smart switch and 1 AccessPoint connected to a dumb switch what is connected to the US-8-150W (all devices eventually come to the US-8-150W as the uplink is the USG Router).

A simple test towards the AP connected to the dumpswitch is showing that the VLAN is working

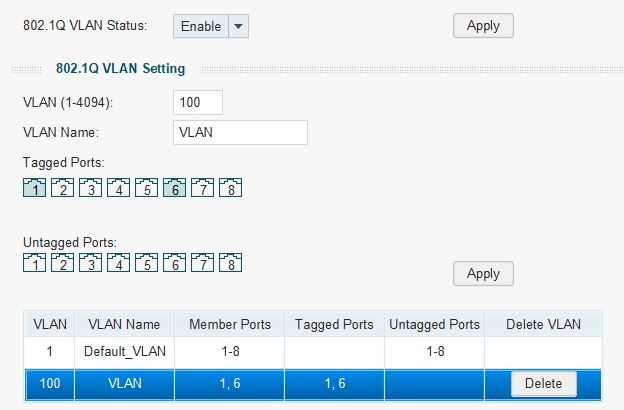
To have the VLAN100 working towards the other APs you need to tag the ports in other smart swiches. In my situation 2 different TP-Link devices

Tips for the TP-Link: TLSG108E: enable 802.1Q (no need to set the 802.1Q PVID setting)

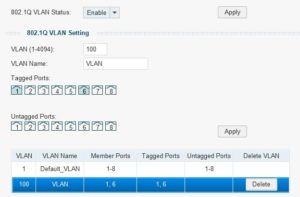
In my example you see that port 1 and port 6 are tagged with VLAN 100. Port 1 is the uplink port towards the other switch (the unifi switch) and port 6 is the port towards the AccessPoint

Apply and save the configuration and your guests can access the guest portal over VLAN

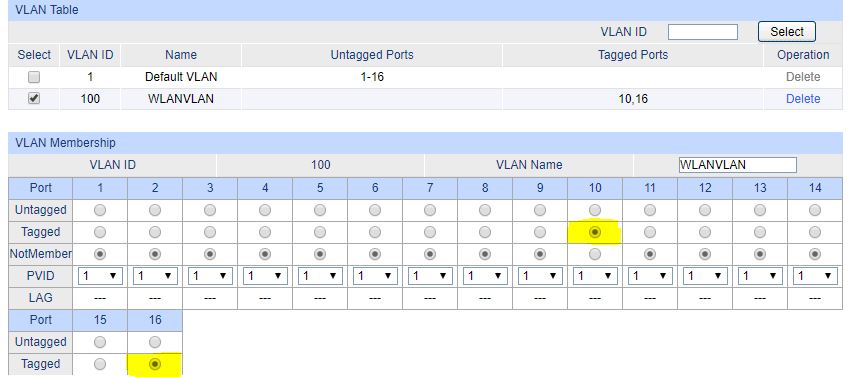
the TP-Link SG2216 is a business smart switch so the screens are a little different

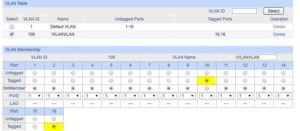
Here you see the VLAN section of the SG2216 where I tagged port 16 (uplink port towards the Unifi Switch) and port 10 connected to the AccessPoint. Now this AccessPoint is also serving VLAN towards my Guests.

Maybe you wonder what will happen to your normal LAN clients when you enable or tag ports on VLAN100: your normal LAN is not tagged and the switches will forward your data normally.

Kodi and texturecache

There is a nice tool for updating your db (mine is MySQL) with a tool called texturecache

this info is for my own purpose if useful use it

Crontab in place

0 */2 * * * sh /home/kodi/kodiupdate.sh > /dev/null 2>&1

#!/bin/bashNAME=texturecache
INIT_DIR=/etc/init.d
echo “Start Scanning Video Library vscan”
/home/kodi/texturecache.py vscan
sleep 5
echo “Start Cleaning Video Library vclean”
/home/kodi/texturecache.py vclean
sleep 5
echo “Start update with qax”
/home/kodi/texturecache.py qax
echo “Start scanning texturecache with function C”
/home/kodi/texturecache.py c
sleep 5
echo “Prune data missing on disk P”
/home/kodi/texturecache.py P
sleep 5
echo “Start update with Xd”
/home/kodi/texturecache.py Xd
sleep 3
echo “Start update with ./texturecache.py R”
/home/dennis/kodi/texturecache.py R
sleep 3
echo “end”

Make sure that there is a connection with your “Master Kodi”
create a samba link in /etc/fstab ie. example
//192.168.1.115/Userdata/ /media/kodi cifs guest,uid=1000,iocharset=utf8 0 0
now the thumbnails can be saved correctly

Fixing BSOD within Windows 2008 R2 after installing wrong VIOSTOR driver under Cloudstack

I needed to expand my Windows 2008 R2 server with extra HDD data. I had an ISO available with VIOSTOR drivers (Virtio Storage) and autodetected the drivers. How could I be so stupid.

after reboot: BSOD and BSOD and stupid as I was I was unable to go back to ‘last good known configuration’.

first of all I had to pick the drivers for Windows 2008 from this location: ISO/viostor/2k8/(R2 if you have it)/amd64/viostor.*

To stop the BSOD from happening:

Find the viostor drivers (probably):

Windows/System32/drivers/viostor.sys
Windows/DriverStore/FileRepository/viostor.inf_amd64_neutral_b5a4b523b42ac3b3/viostor.sys
Windows/DriverStore/FileRepository/viostor.inf_amd64_neutral_e322cb56cfbcc209/viostor.sys
Windows/LastGood/system32/DRIVERS/viostor.sys

Rename Windows/System32/drivers/viostor.sys to System32/drivers/disabled.viostor.sys.disabled;

Similarly renamed both Windows/DriverStore/FileRepository/viostor.inf_amd64_neutral_b5a4b523b42ac3b3/viostor.sysand Windows/DriverStore/FileRepository/viostor.inf_amd64_neutral_e322cb56cfbcc209/viostor.systo disabled.viostor.sys.disabled

Then reboot.

Please be noticed that it can cost you a NEW license if you add this driver. Your hardware can be changed and it could be that Microsoft does not allow your key anymore.

Performance issues HP Microserver gen8 and VMWARE EXSI 6.5

upgraded ESXI to 6.5 U1 which is version 6.5.0 build 5969303

You are running HPE Customized Image ESXi 6.5.0 version 650.10.1.0.47 released on July 2017 and based on ESXi 6.5.0 Vmkernel Release Build 5310538

unfortunately the HP Microserserver Gen8 is than running with: HPE_bootbank_scsi-hpvsa_5.5.0.102-1OEM.550.0.0.1331820

As I was (and still am but as of writing I am in maintenance mode) seeing spikes in my CPU usages. It might be caused by the bad performance

checking with:
cd /vmfs/volumes/datastore1
time dd if=/dev/zero of=tempfile bs=8k count=1000000

It took a very long time to see some output. (Very long time!)

than I tried to downgrade to the hpvsa-5.5.0-88.zip driver

guidelines:

  1. enter maintenance mode
  2. I do a reboot, but you can do it probably without
  3. copy the downloaded driver to /tmp/ and run the following command
  4. esxcli software vib install -d /tmp/hpvsa-5.5.0-88.zip
  5. the old driver will be removed and the 5.5.0-88 driver installed
  6. Now important: if you do reboot this way: you will not see your DataStores anymore, only your NFS datastores (in my situation) this is caused by VMWARE ESXI as it will be using vmw_ahci driver for the datastore.
  7. so disable the usage of this ‘default’ driver: esxcli system module set –enabled=false –module=vmw_ahci
  8. now you can reboot and your device will be using the 5.5.0-88 driver
  9. you can see this by using; cat /proc/driver/hpvsa/hpvsa0

update (taken from: https://homeservershow.com/forums/topic/9602-esxi-notes/)

When installing VIB you first need to un-install the old driver

How to downgrade the hpvsa driver in 5.5 and 6.0
The b120i driver from 5.5.0-90.0 to 5.5.0.98-1 has performance issues and requires a downgrade to 5.5.0-88.0. Newer versions may still be affected so check the forum or this thread for more details.

Download scsi-hpvsa-5.5.0-88OEM.550.0.0.1331820.x86_64.vib from the HP VIB depot and upload it to your datastore. It is the same driver for 5.5 and 6.0.

Enter maintenance mode and run the following command. You’ll need to reboot after changing the driver and then leave maintenance mode. Do NOT restart without reinstalling the driver after removing it.

important: remove the old driver !!

esxcli software vib remove -n Hewlett-Packard:scsi-hpvsa

install the NEW driver:

esxcli software vib install –viburl=/vmfs/volumes/[NAME OF DATASTORE]/scsi-hpvsa-5.5.0-88OEM.550.0.0.1331820.x86_64.vib

If you get an error saying bootbank cannot be live installed
The error will be similar to the following:

The transaction is not supported:
VIB VMware_bootbank_esx-base cannot be live installed.
VIB VMware_bootbank_esx-base cannot be removed live.
The bootbank is the system image that ESXi loads into a ramdisk and boots off.
It is only used during startup and during updates.

The error is generally due to two things.
First is corruption and second is if the boot device is not accessible for some reason.
On the Gen8 Microserver, doing an iLO update whilst the system is running may cause the micro-SD reader to temporarily stop working.
The solution is to shutdown the host, unplug the machine for 5 seconds, plug it back in and attempt the update again

the speed should have been returned.


The hassle of upgrading ESXI 6.0 to ESXI 6.5 on a HP Microserver gen8

Wauw ..

yesterday and today I tried to upgrade my HP Microserver Gen8 from VMWARE ESXI 6.0.0 to 6.5
what a trouble ..

Steps:
shut down all vms (hosts) and enter maintenance mode. If you do this there are a number of online blogs with help to install from online depots but in all my tests it was too slow or I was to impatient to wait to end. But in the end I always ended up with an system with errors:

the transaction is not supported: VIB Hewlett-Packard_bootbank_scsi-hpvsa_5.5.0-88OEM.550.0.0.1331820

Do not try to force the installation. You will end up with an system where it seems that your EXSI is updated to 6.5 but actually is is running in a ramdisk environment. Easy to see cause you have lost your datastores (NFS datastores are still mounted).

If you than reboot: you are back to 6.0.0 .. so how to solve this:

easy: when entering maintenance mode: reboot your machine. In many guidelines this part is not mentioned.

After I rebooted I first tried the online depot installation documentation but ended up waiting and waiting. I got a VMWARE image for update from VMWARE but I got all kinds of different issues again:

“The upgrade contains the following set of conflicting VIB” When using the standard image of VMWARE: many conflicting vibs a no go for me. So I read some blogs and I found out that it is best to keep using your HPE image vmware files. (So in short: if you used the HPE VMWARE ESXI ISO installing Esxi onto your HP Microserver Gen8 keep using the update files with HPE in it and not the plain VMWARE onces. It can give issues !

After I used the HPE image I only got 1 issue: one vib was still complaining. On this blog I read what I needed to do: remove this vib (partner supported, so not native).

After removing this VIB I could upload the various ZIP bundle files like

VMware-ESXi-6.5.0-5310538-HPE-650.10.1.0.47-Jul2017-depot.zip
VMware-ESXi-6.5.0-Update1-5969303-HPE-650.U1.10.1.0.14-Jul2017-depot.zip

with the command:
esxcli software vib install -d “/vmfs/volumes/datastore1/patch-directory/VMware-ESXi-6.5.0-5310538-HPE-650.10.1.0.47-Jul2017-depot.zip”

I was able to install finally the 6.5 version. Due to issues of Storage driver I immediately updated to the U1 update
with the command:

esxcli software vib update -d “/vmfs/volumes/datastore1/patch-directory/VMware-ESXi-6.5.0-Update1-5969303-HPE-650.U1.10.1.0.14-Jul2017-depot.zip”

the blog nxhut showed me some info that with the U1 version the storage speed performance issues should be over.

A simple test downloading a file towards a VM showed me a 18MB/s so the 10MB/s barrier was not seen.

A last reboot and get the machine out of maintenance mode. Finally I have a running 6.5U1.


If you want to connect to your local server what is behind openvpn and yourself are connected with a VPN to your local network

Yeah .. wierd title

So in my case: I am at location A and I am making a VPN to my local network what is at location B

I can access all my local servers and computers, but one !

“The One” is a server which has a dedicated openvpn connection to location C, when this is active my VPN from location A cannot access “The One” at location B. Only when the OpenVPN connection is terminated

Solution: add a static route on “The One”

check with: ip route show

and add the route like this: ip route add 10.10.10.0/24 via 10.1.1.1 dev eth0

where 10.10.10.0 is the VPN IP range what your local network is giving VPN users and via 10.1.1.1 is the IP of your gateway (router)

… easy peacy ..