Mijn BBS historie

Ik kwam toevallig oude historie tegen op het internet met de BBS node informatie

Mijn oude node informatie uit Borne, ineens zie in een oude telefoonnummer weer en een nodenummer die ik helemaal niet meer herken.


en dan mijn tijd in Amersfoort ..


zie ook de verandering in ondersteunende protocollen .. X.75 .. wie kent het nog ;)

via

Ooit bestonden er BBS-en met analoge modems en ISDN

Ik las dat KPN stopt met ISDN (2018/2019). Ik ging even terug in de tijd met mijn gedachten.

Ik kwam toen een stuk tekst van mezelf tegen op het oude internet ..

Ongeveer 6 jaar geleden kwam deze jongen in aanraking met het fenomeen:
Datacommunicatie. Een Bausch 2496 faxmodem was aangeschaft, en vele telefoontjes naar BBS’s werden gepleegd.

Op den duur kwam bleef ik naar een select aantal BBS-en bellen alwaar ik mijn bestanden betrok. Een ervan is het helaas per 27 okt 1996 opgeheven UtilSoft BBS te Enschede.

Aangezien ik een geregelde inbeller van dit bbs was, en mij meer begon te interesseren voor het BBS gebeuren ging ik zeer veel berichten schrijven met de Sysop van dat BBS. Deze Sysop maakte mij attent op het feit dat ik op zijn BBS point kon worden om zo vlug en zonder al te veel telefoonkosten mijn berichten op te halen en te versturen. Ik werd dus point.
Aangezien er maar 1 of 2 meerdere mensen waren die dagelijks zijn post op haalde ben ik actie gaan ondernemen om meer mensen hierin te gaan betrekken.
Ik had succes en binnen een jaar had UtilSoft 50 points die zijn/haar mail op kwamen halen. Aangezien je na een tijdje het mailen als routine beschouwd kan worden wilde ik verder.

Ik werkte met een Commodore XT 10mhz en een 20Mb harde schijf.
Interesse was er voor het BBS wereldje en tjsa ik begon op zich met Remote Access te werken op mijn XT, en wonderbaarlijk het lukte. Natuurlijk moest er een naam voor het BBS bedacht worden. Eigenlijk was het niet zo moeilijk om een een ‘unieke’ naam te bedenken.

Ik werkte op een zeer ‘oud’ systeem (de 386 was toen TOP en de 486 kwam eraan) en het was eigenlijk een Baby onder de BBS systemen. Aangezien ik software aanbood dacht ik meteen aan de naam: BabySoft. Het BBS was geboren, alleen niet voor lange duur. Studie, uitgaan, geld, en het geen toestemming hebben om op de telefoonlijn van PAPS en MAMS te beginnen waren de hoofzaken om het BBS af te blazen.

2 Jaar later kreeg ik een ander systeem een 486SX25 met 210MB en 4MB intern geheugen op mijn kamer te staan. Studie was afgelopen, een vaste baan nog niet gevonden en dus veel tijd besloot mij om het BBS weer eens nader te gaan bekijken. Op dat moment had ik al een eigen telefoonlijn op mijn kamer liggen Er werd met een schone lei begonnen. Binnen een uur was het begin er, en konden mensen al inbellen. Het zag er niet uit. Gewoon zo standaard als de pest. Maar het werkte. Langzaam maar zeker kon ik het BBS in de avonduren openstellen Bekenden uit de buurt, medepoints belden geregeld in. BabySoft is dan ook in zijn ‘finale’ versie opgericht op 1 mei 1995
10 tot 15 bellers op een dag waren op dat moment absoluut TOPdagen.

Op 11 november werd het BBS verplaatst van Borne naar Amersfoort, aangezien ik een baan kreeg in het midden des lands. Binnen anderhalve maand lag daar ook een ISDN lijn en kreeg het BBS meer en meer inbellers. Het systeem werd geupgraded, en op dit moment is het enige wat nog oud is het mainbord, de rest is allemaal al een keer geupdated. Op dit moment heeft BabySoft zo’n 80 inbellers en een userbestand van ongeveer 1000 mensen die geregeld inbellen. Tevens heeft BabySoft zo’n 60 points die dagelijks/wekelijks de berichten ophalen die er voor hen in de verschillende berichten gebieden staan. Hiermee is BabySoft een van de grootste POINT bbs-en van midden Nederland geworden.
Dennis Slagers

Update: Boot from USB with HP Microserver Gen8 and OpenMediaVault

Only usable if you use OMV with HP Microserver Gen8 where you cannot boot from a ODD disk (connector) and inserted HDDs in RAID)
Today, a day before my holiday (murphys law). I noticed that suddenly a samba share was not responsive anymore and that OMV was running in read-only mode.

A quick scan showed first a 2,5″ HDD failure (the disk where OMV is on) and a second scan showed that the USB flash drive with grub (this starts OMV) was not accessible anymore.  (probably caused due too high temperatures last week).

The RAID installation with 4 HDDs was expected to be ok.

So I grabbed a new flash drive, and a new 2,5″ 500GB disk (I had those laying around especially for this purpose). a bootable SD card with OMV 4 was also present

Steps:
1. change the 2,5″ disk (remove the failed one and connect the new disk)
2. insert the SD card, boot and OMV splash screen should be shown, install OMV on the 2,5″
3. After reboot insert the USB flash drive after OMV is booted
4. my USB drive is /dev/sdb
5. clean the flash drive
dd if=/dev/zero of=/dev/sdb bs=512 count=1
6. fdisk the flash drive as a bootable linux drive:
I believe the sequence as:
fdisk /dev/sdb
> n
> p
> 1
<enter this>
> a
(toggles boot flag)
>w
write this 

7. format the drive: mkfs.ext3 /dev/sdb1 (please notice the 1 !!, not using this issues with grub !! (Message to self)
8. mount the drive with mount /dev/sdb1 /mnt
9. grub-install –no-floppy –root-directory=/mnt /dev/sdb
Please notice that it is used: dash dash no-floppy dash dash root-directory
10. grub-mkconfig -o /mnt/boot/grub/grub.cfg

Message to self: if there is any issue reported in the screen about ext2, or about blocks .. no correct installation and usage of grub and your system will not boot


Calibre, Calibre-Web with a network share

A lot of people do report issues with the Calibre database when the database is on a NAS or network drive. Last week I had issues with Calibre-Web and the validation of the database when Calibre and Calibre-web do maintenance on the database.

People get: “CantOpenError: CantOpenError: unable to open database file”

Within the comments the git repository of Calibre-web I got a hint.  and that solved my issue
a number of years I was running a 13K ebook database, but I was never satisfied. Adding books was almost impossible without syncing, copying books, move the database and messing up the database with duplicates. Terrible.

Last week the database was not able to fix itself anymore and I decided to start over with only those books I really like or wanted to keep. And I wanted to fix the database issues.

To fix it, you must be able to run a NAS or (virtual) Server with SAMBA version1 (NT1).  As I am running VMWARE a new Linux Server was built quickly. Please be noticed that I do not care about security in my home network on that machine and for that purpose.

Import configuration steps in /etc/samba/smb.conf

[global]
min protocol = NT1
max protocol = NT1
client min protocol = NT1
client max protocol = NT1
# this will run samba in Samba Version 1 mode.

[share]
force user = [a-username]
path = /var/www/html/books
writeable = yes
browseable = yes
guest ok = yes
guest account = [a-username]
create mask = 0777
directory mask = 0777
oplocks = false
level2 oplocks = false
# Especially the oplocks on false are needed. If not Calibre-Web will not get access to the database if Calibre is using it. If that happens your database can be corrupted again very quickly.

If you run Calibre under Windows 10 make sure you add SMB1 support through the ‘features’ option this is disabled by default.

I started with 400 books and now I added 520 books in many sessions without any open database issue.

Using the oplocks on false could be also a solution when using SMBv3 or SMBv4 but I did not try that.

Please also notice that the writer of Calibre does not suggest to use a network share and it is known that for some it is working fine and for others not. This blog items could lead to more solution(s). Even it is not supported ;)

Letsencrypt wildcard renew on non api DNS

./acme.sh –issue -d *.domain –dns –yes-I-know-dns-manual-mode-enough-go-ahead-please
./acme.sh –renew -d *.domain –yes-I-know-dns-manual-mode-enough-go-ahead-please

issue – add special key to domain dns provider (TXT record: _acme-challenge.[domain]
than renew the key (2nd command).

I use it with apache and in the ssl conf I direct to the location where the cert and key is saved

Rsync config with MailinaBox gives: invalid literal for int() with base 10: ” message

Mail in  a Box (mailinabox) can backup its mail with rsync to a destination of your choice. When it was working but your target backup machine has been changed suddenly mail in a box comes with the message: invalid literal for int() with base 10: ”

You checked, double checked your settings and they are all ok .. but still the above message. The reason is that Mail in a Box keeps a record of your SSH keys to protect itself:

messages like:  WARNING: POSSIBLE DNS SPOOFING DETECTED!  and

The ECDSA host key for [my.box.org]:22 has changed,
and the key for the corresponding IP address [target.ip]:22 has a different value. This could either mean that DNS SPOOFING is happening or the IP address for the host and its host key have changed at the same time. Offending key for IP in /root/.ssh/known_hosts:7

Normally this is good behaviour but now you need to have fixed this: its easy with this command
ssh-keygen -f “/root/.ssh/known_hosts” -R [my.domain.name]:port


Multiple SSH instances on OpenMediavault

I have a port 22 open towards a device allowing me to logon. I have mutiple other devices also with SSH but I do not want them available over the internet. This is fine as long as you do nothing in your portforwarding.

But as I wrote earlier in a previous post: I need SSH for my RSYNC backup. This cannot run on port 22 as the device where port 22 is open is not the device running what is the target for the RSYNC job.

So we do configure openmediavault (4.x) to have 2x a SSH instanc running on a different port with a different configuration

The 2nd instance allows only a login with public key. All other logins are disabled.

Simple steps:

cp /lib/systemd/system/ssh.service /etc/systemd/system/sshdrsync.service
modified 1 certain part in the target file:
ExecStart=/usr/sbin/sshd -D -f /etc/ssh/sshd_rsync_config $SSHD_OPTS

than copied the standard ssh config from OMV to the sshd_rsync where I modified the port to the port it needs to run on.

this you can find in /etc/ssh

Please note that in the ssh file I already had the include part about the public key (where to find it).

than: 2 commands:

systemctl enable sshdrsynd.service

systemctl start sshdrsync.service

ready set and go .. 10 min work. (testing is simple ssh to the new port, your login will tell you that it is only allowing with public key.

Backup MIAB (Mail in a Box) through Rsync towards Openmediavault Server

Mail in a box (MIAB) has a backup feature available. It stores full and incremential backups on the mailserver and it is possible to store the backup also on another device through RSYNC. In my situation I am saving the data to an OpenMediaVault NAS

Here I write my own: How I did it (quick and dirty cause I expect you to know things).

In short:
rsync over port 5678 to backup your data to the OpenMediaVault NAS

  1. Make sure you have a hostname available where rsync can be connected to, the hostname must point to the IP where the OMV (OpenMediaVault) is connected
  2. Rsync over SSH is being used.
  3. if you do not want to use port 22 with Rsync, you need to modify /root/mailinabox/management/backup.py line 19: change -p 22 to -p 5678
  4. Enable Rsync Server in the GUI (Grapical User Interface) of openmediavault.

Please note that it is not possible to use the ~/.ssh/config file where you can add the port as well. The reason is that the verification process needs in the backup.py a -p setting which is not overridden bij de config file.

  • SSH standard port 22, this we will change. (ie. port 22 is already in use towards another server)
  • In the router go to your portforwarding section and open port 5678 towards port 22 to your device (with OpenMediaVault).
  • MIAB and RSYNC needs to have the full path where to store the backup. In my situation: /media/a925efd7-ada5-48b5-80e6-383cc6274bcd/Backup (the folder must available and writable
  • Make sure that a user can login with SSH and can access OpenMediaVault
  • MIAB is providing a public key for auto-login needed for rsync. this key must be available in OpenMediavault. You can put the public key in: ~/.ssh/authorized_keys or in a folder in /var/lib/openmediavault/ssh/authorized_keys where you create a file with the name of the user
  • within MIAB you can use from /root/mailinabox/ the following: sudo management/backup.py –verif

to test if your public key is accepted: from MAIB ssh with the following command:  ssh -p 5678 -i /root/.ssh/id_rsa_miab user@domain.name

If this is giving you a direct login to your OpenMediaVault NAS you can use Rsync ;)

Missing something? Reply and ask


VLAN for Guests with Ubiquity: Unifi USG, USW8-150, AC-Pro, AC-LR and other stuff

This posts is merely an overview of what I did to get my WLAN guests, who access the Internet through the hotspot feature of the USG and the Unifi controller,through a VLAN so that they are not part of my own private network. (security)

This handout only applies when you own some gear of Ubiquity. (I have also other hardware, here you might have to make some configuration as well, my situation is explained.

What hardware is in the network
USG Router – US 8-150W switch – AC-Pro, 2 x AC-Lite AccessPoint (Unifi stuff)
1x TP-Link TLSG108E (Smart Switch)
2x Dump switch 5 port Netgear (not important in this story)
1x TP-Link TLSG2216 (Smart Switch)

1st Create a guest network with VLAN100. Do this only if you have the USG. If you do not have an USG this does not apply cause the network part in the controller is for use with the Unifi USG router.

If you use “Guest” it is already isolated from your corporate LAN.
Modify other settings like DHCP in this menu. This I do not explain.

Now make sure your SSID for your guests can be on a VLAN

This is the most important part.

Notice: I have an US-8-150W. When creating a VLAN Guest network in the profiles part of the controller the ports will be configured automatically. As long as you have all profiles accepted on the ports, the VLAN will directly work if your AccessPoint is directly connected to the Unifi Switch.

In my situation I have 2 AccessPoints behind a smart switch and 1 AccessPoint connected to a dumb switch what is connected to the US-8-150W (all devices eventually come to the US-8-150W as the uplink is the USG Router).

A simple test towards the AP connected to the dumpswitch is showing that the VLAN is working

To have the VLAN100 working towards the other APs you need to tag the ports in other smart swiches. In my situation 2 different TP-Link devices

Tips for the TP-Link: TLSG108E: enable 802.1Q (no need to set the 802.1Q PVID setting)
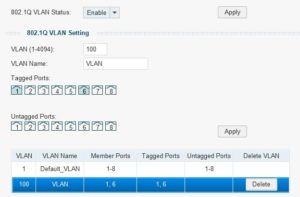
In my example you see that port 1 and port 6 are tagged with VLAN 100. Port 1 is the uplink port towards the other switch (the unifi switch) and port 6 is the port towards the AccessPoint

Apply and save the configuration and your guests can access the guest portal over VLAN

the TP-Link SG2216 is a business smart switch so the screens are a little different
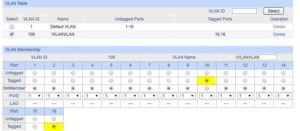
Here you see the VLAN section of the SG2216 where I tagged port 16 (uplink port towards the Unifi Switch) and port 10 connected to the AccessPoint. Now this AccessPoint is also serving VLAN towards my Guests.

Maybe you wonder what will happen to your normal LAN clients when you enable or tag ports on VLAN100: your normal LAN is not tagged and the switches will forward your data normally.

Add route to Linux system to allow a VPN connection access the System which is behind a VPN ;)

Okay machine ‘I am behind a VPN’ can be accessed locally: 10.1.1.20, with OpenVPN it is behind an external IP address, not mine
I set up a VPN to my local network: 10.10.10.50 is my IP when I am behind a VPN, when I try to access 10.1.1.20 it is not allowed, where other machines in the same network are ok.
This is due to the OpenVPN connection being active (when disabling OpenVPN, than all is ok), so trying to be able to allow the remote VPN access the machine.

Now I did 2 things and I believe the first command did it.

1. used a new route:
ip route add 10.10.10.0/24 (VPN) via 10.1.1.100 (router) dev eth0

and I used
2. iptables -A INPUT -s 10.10.10.50 -j ACCEPT (but this one did not work, but I will mention it .. you never know)